February 2025: What’s new in AntsRoute?
Blog > Product updates > February 2025: What’s new in AntsRoute?
February 2025: What’s new in AntsRoute?
Published on 19 February 2025 • Reading time: 11 min read

We’re delighted to present the latest version of our route optimisation software. This update includes innovative features to improve planning and tracking in the field, and optimise your operations. Don’t wait any longer to find out about these new features, which will make your day-to-day work more efficient!
Table of contents:
- Display breaks in ongoing routes and on the mobile application
- Define geographical zones with constraints
- Customise customer opening hours for specific dates
- Booking site: add appointments to the basket of work orders
- New ‘List of items’ tab for even more precise tracking
- New sectorisation option: flexible or strict mode
- Display work order and item prices on the mobile application
- Define a maximum authorised distance for adding a work order
- User role: authorise display of route and work order prices
- New entry points available on our API
Display breaks in ongoing routes and on the mobile application
Here’s an update that many users have been waiting for! AntsRoute already lets you define drivers’ working hours and include daily breaks. Up until now, these breaks were only visible on the web interface, in routes that had not yet started.
From now on, the break will also be displayed:
- In ongoing routes in the ‘Track’ module on the web interface.
- On the mobile application used by drivers.
Your teams in the field can view the following information directly on the mobile application:
- The duration of the break
- Planned start time
- Planned end time
And there’s another new feature! If you’ve activated the option allowing drivers to validate their arrival on site and their departure in order to calculate the actual duration of their work, they’ll now be able to do the same for their breaks.
How do I use this feature?
- If you haven’t already done so, define your drivers’ breaks:
- Go to the ‘Resources’ > ‘Drivers’ module.
- Open a driver’s file and go to the ‘Working hours, locations and skills’ tab.
- Click on the icon ☕ to enter a break.
- Specify the duration and the time slot in which it can be started.
- Save your changes.
- Plan your routes with integrated breaks: When optimising routes, AntsRoute will automatically take these breaks into account and integrate them into the schedule.
- View breaks in ongoing routes: You can now view these breaks not only in scheduled and non-started routes, but also in ongoing routes, directly in ‘Monitor’ module and on your drivers’ mobile applications.
To learn more about this function, read our support article.
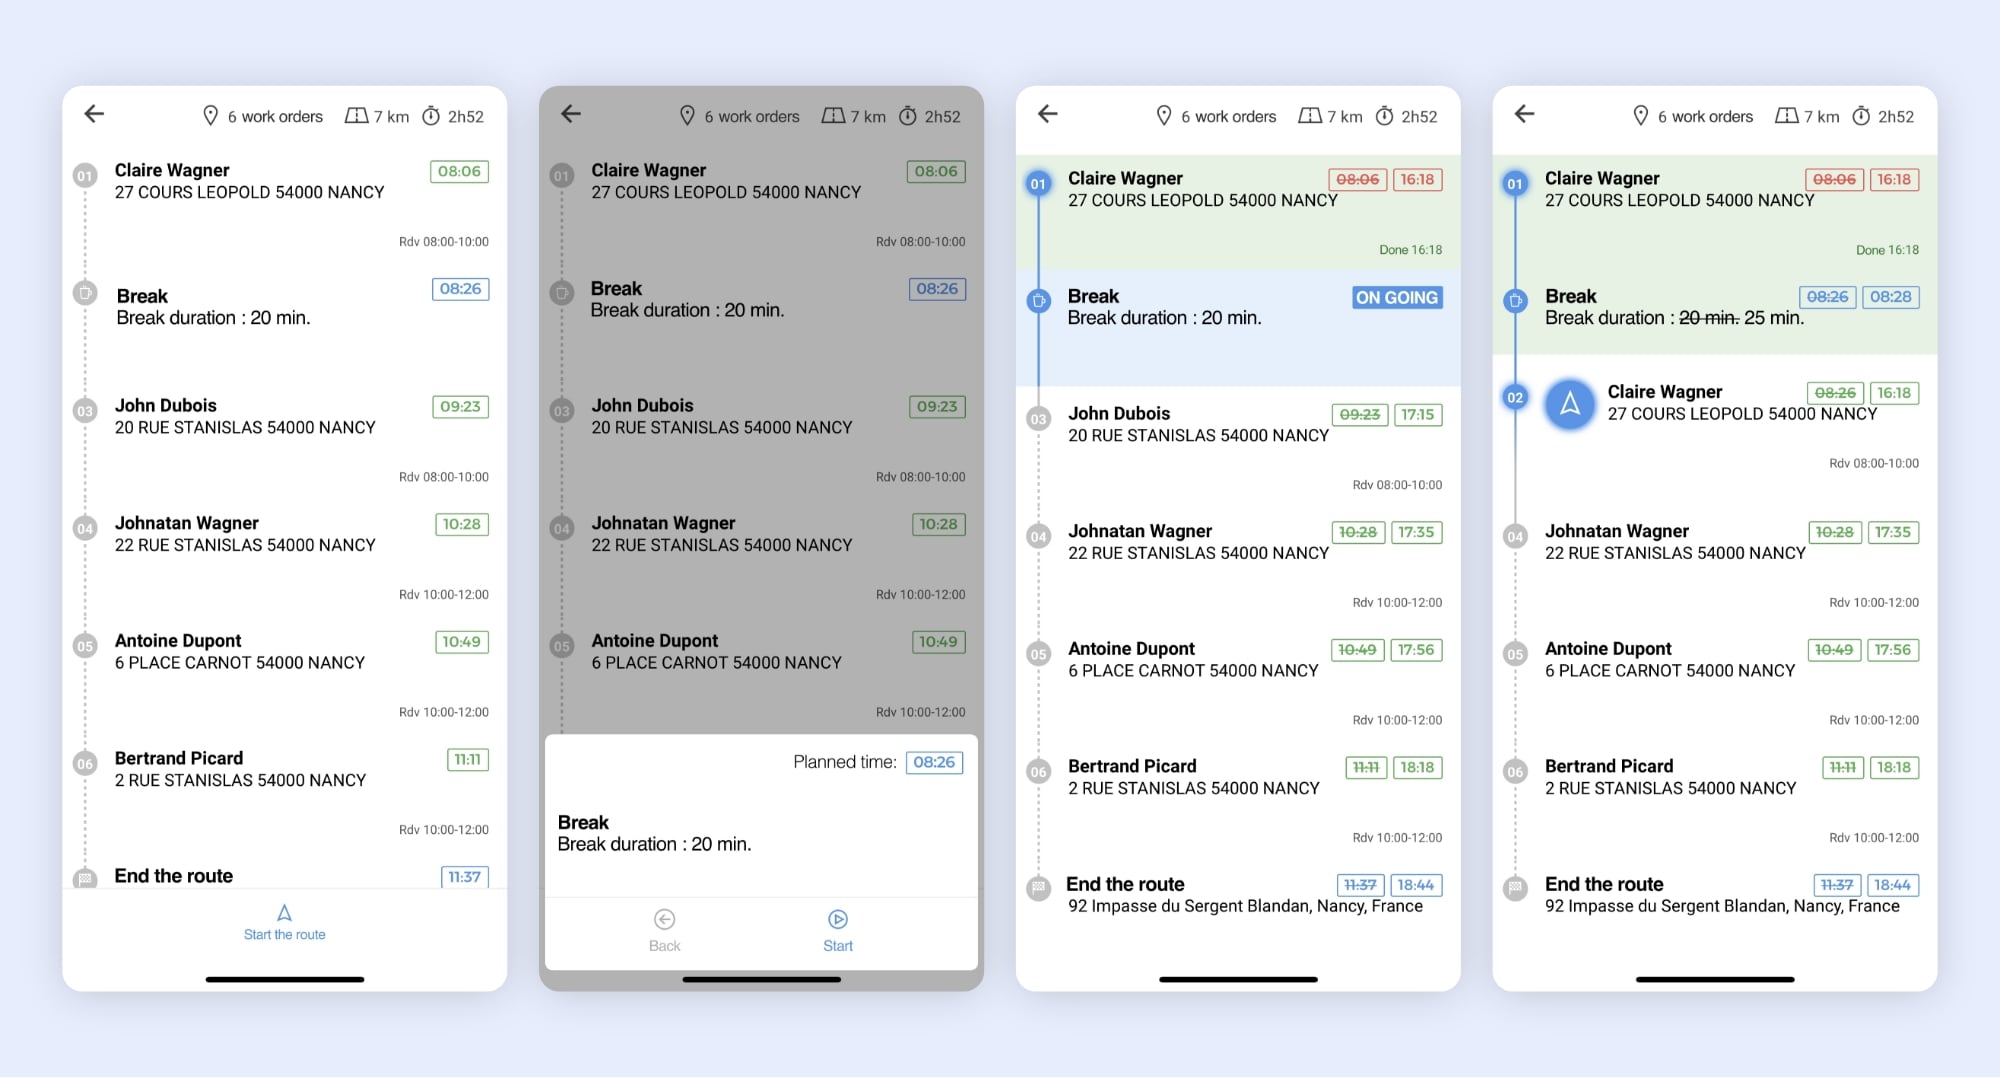
Display of the break on the mobile application.
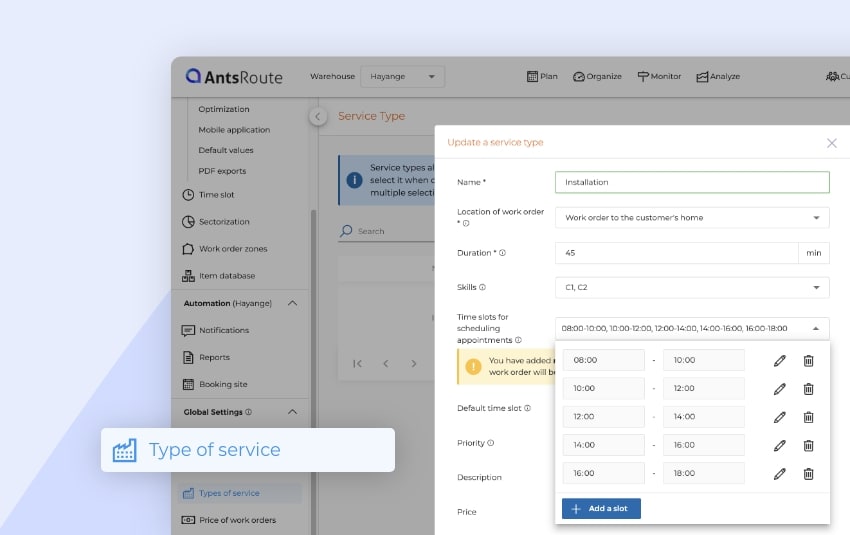
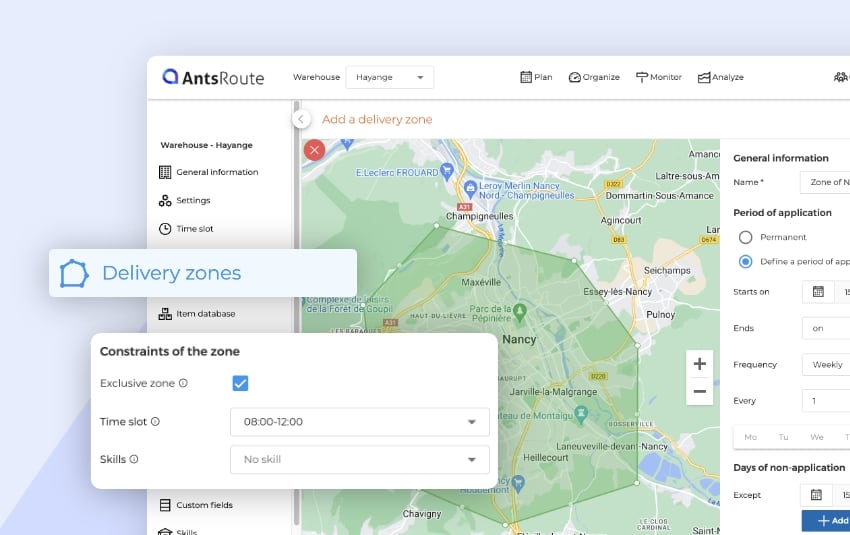
Define geographical zones with constraints
We’re delighted to introduce this new feature: the ability to create geographical zones with constraints.
This feature is similar to sectorisation, but goes even further! It allows you to assign specific time slots and skills to operations in a given zone over a defined period.
What is the difference with sectorisation?
Sectorisation means that drivers can be assigned to fixed sectors, according to a weekly schedule.
Geographical zones allow you to add specific constraints over a given period, with exclusion days if necessary.
And that’s not all! You can assign personalised constraints to each zone:
- The period of application
- Days of non-application within this period
- Exclusive zone (work orders outside the zone cannot be scheduled during the defined period)
- Time slot
- Skills required (in addition to the skills required for work orders)
Good to know: You can use the sectorisation and geographical zone functionalities at the same time for ultra-optimised management of your routes!
How do I activate and use geographical zones?
- Activate the option in the settings
- Go to ‘Settings’ > ‘General settings’.
- Activate the ‘Activate work order zones’ option, then save.
- Create your first geographical zone
- A new ‘Work order zones’ tab appears in the ‘Settings’ module.
- Click on the ‘+’ button to add a new zone.
- Define the zone parameters
- Specify a name and a period of application (e.g. from 29/01/2025 to 10/08/2025 with a weekly frequency, every Tuesday and Friday).
- If necessary, add days of non-application within this period.
- Draw the zone on the map
- In the top left-hand corner of the map, use the tracing tool to draw the boundaries of your zone.
- Click on ‘Next step’.
- Add constraints
- Define the applicable time slot.
- Specify the skills required.
- Choose whether the zone is exclusive (work orders outside the zone will not be planned on these dates).
- Click on ‘Save’. And that’s it!
Good to know: If several geographical zones are created on the same dates, they will be ‘merged’:
- The skills of the different zones will be added together and applied to the work order.
- The time slot selected will be the shortest among the zones concerned.
How the time slot works:
If a work order already has a time slot, AntsRoute applies the intersection between this slot and the shortest slot of the active zones. Here are a few examples to help you understand:
Case 1:
Work order: 8:00 – 18:00
Zone: 12:00 – 14:00
✅ Time slot selected: 12:00 – 14:00
Case 2:
Work order: 8:00 – 16:00
Zone 1: 8:00 – 14:00
Zone 2: 12:00 – 20:00
✅ Time slot selected: 8:00 – 14:00 (intersection between the work order 8:00 – 16:00 and the shortest slot of the zones 8:00 – 14:00)
Case 3:
Work order: 9:00 – 16:00
Zone 1: 8:00 – 14:00
Zone 2: 12:00 – 20:00
✅ Time slot selected: 9:00 – 14:00 (intersection between the work order 9:00 – 16:00 and the shortest slot of the zones 8:00 – 14:00)
Case 4 (No intersection possible):
Work order: 8:00 – 10:00
Zone 1: 8:00 – 12:00
Zone 2: 14:00 – 16:00
⚠️ No time slot selected, as there is no intersection between the work order time slot 08:00 – 10:00 and the shortest time slot of zones 14:00 – 16:00. AntsRoute will not show availability in this case.
Note: This function is only available with the PRO package.
To learn more about this function, read our support article.
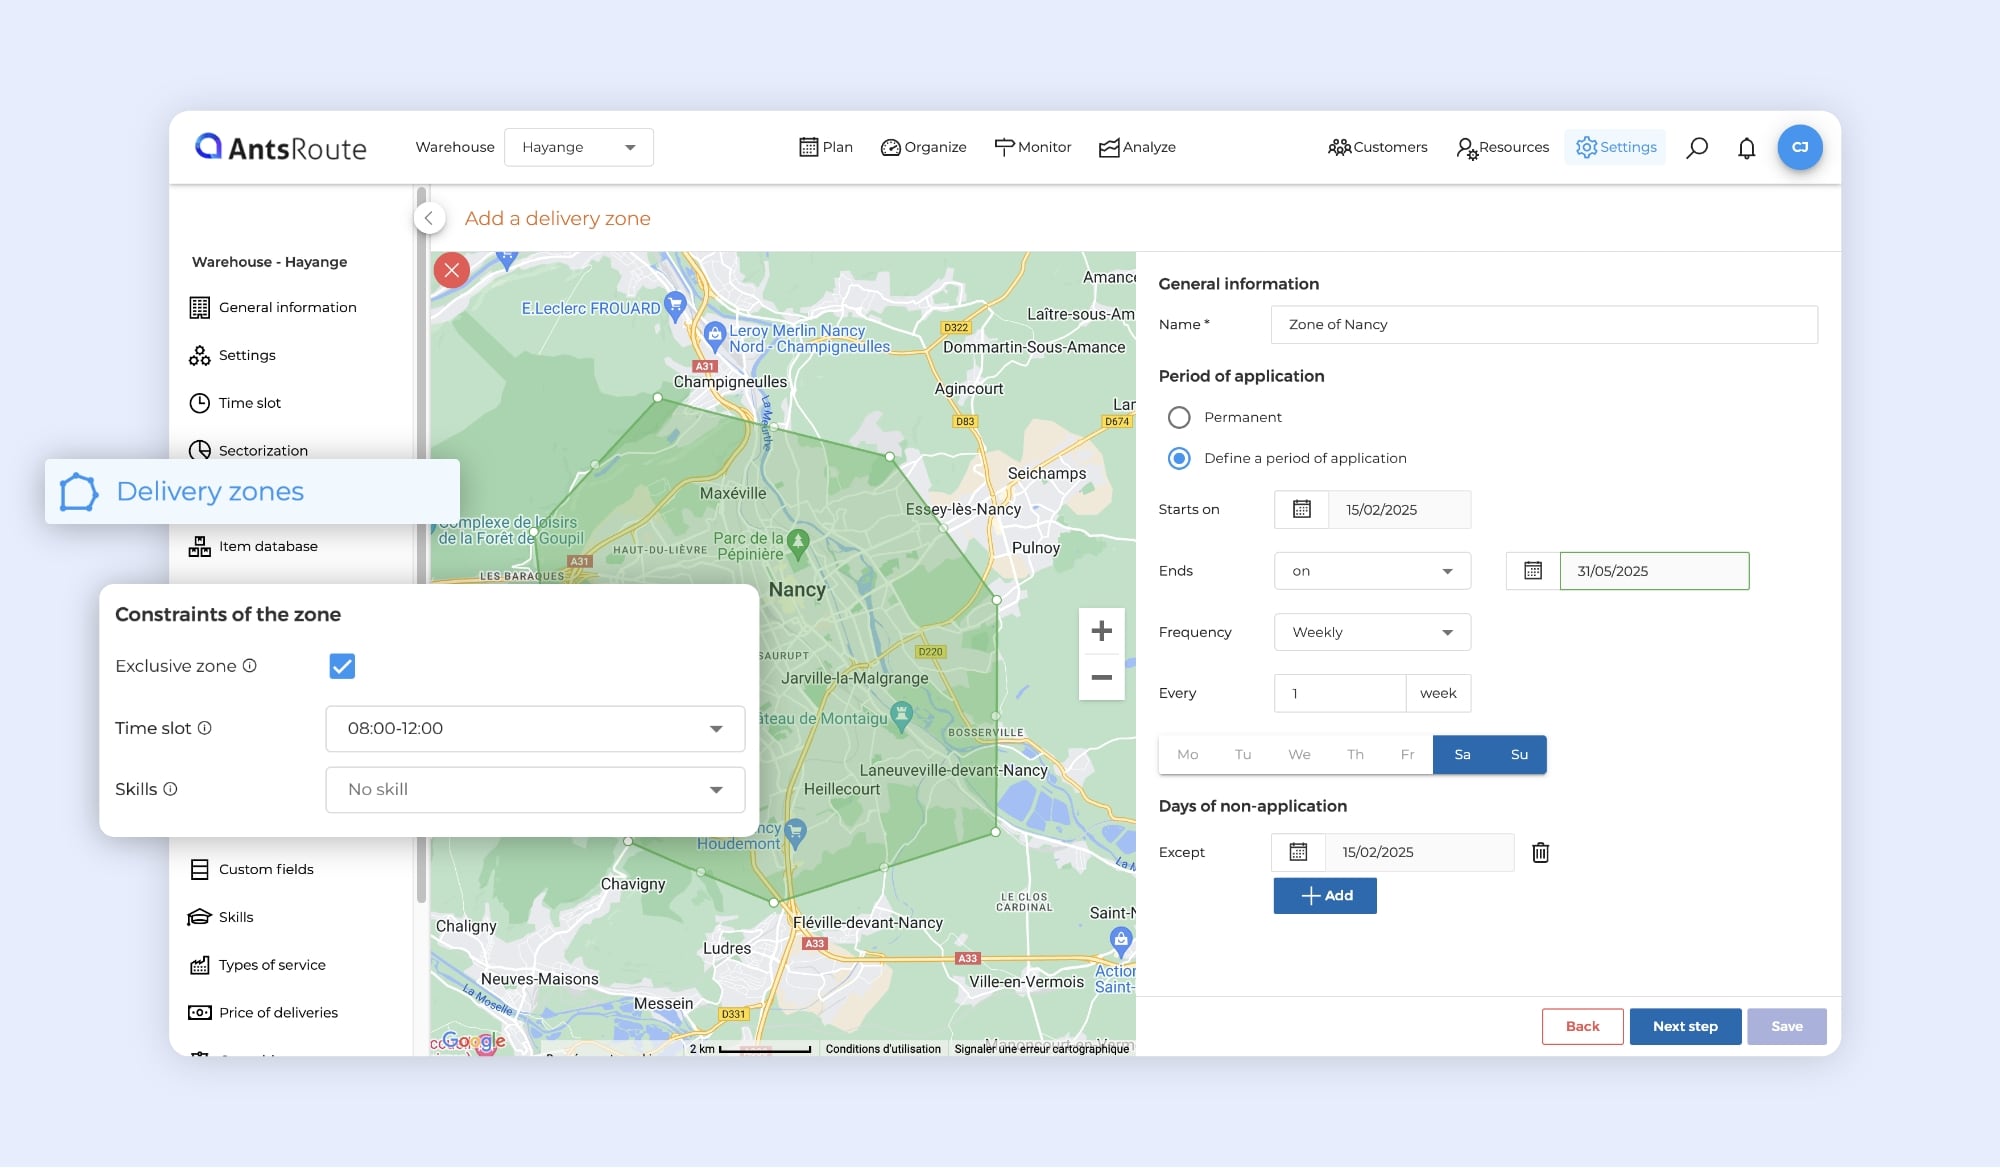
The addition of a geographical delivery zone with constraints.
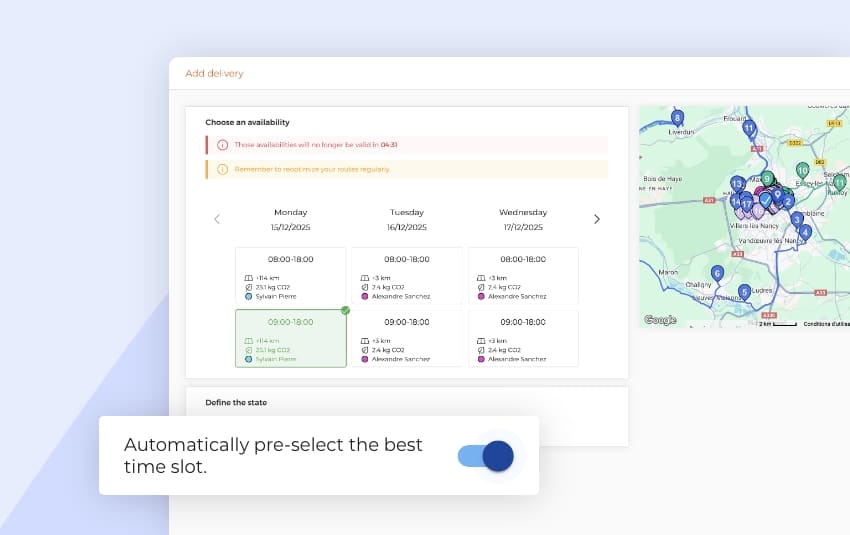
Customise customer opening hours for specific dates
At AntsRoute, we already offer you two ways of defining your customers’ opening hours:
- Option 1: ‘Always open’
This is the option preferred by the majority of our users! But in reality, their customers aren’t always available. Our users therefore prefer to use time slots to respect their customers’ availability. - Option 2: Specific times for each day of the week
For those who don’t want to use specific time slots, this option is ideal. You simply define the customer’s weekly opening hours, and AntsRoute automatically schedules the work orders according to this availability and any other time or business constraints.
We’ve just added a new option: you can now define personalised opening times for specific dates. This is a very practical solution if your customers have different opening times at certain times of the year, such as during the Christmas holidays or special events.
How do I activate this feature?
It couldn’t be easier! Just follow these steps:
- Go to the customer file and open the ‘Opening hours’ tab.
- Start by defining the default opening times: choose either ‘Always open’ or set times for each day of the week.
- To add specific opening hours for a given period, click on ‘+ Hours’. Select the period you want, enter the specific opening times and click ‘Save’.
Now you’re ready to plan your routes with even greater flexibility and accuracy!
To learn more about this function, read our support article.
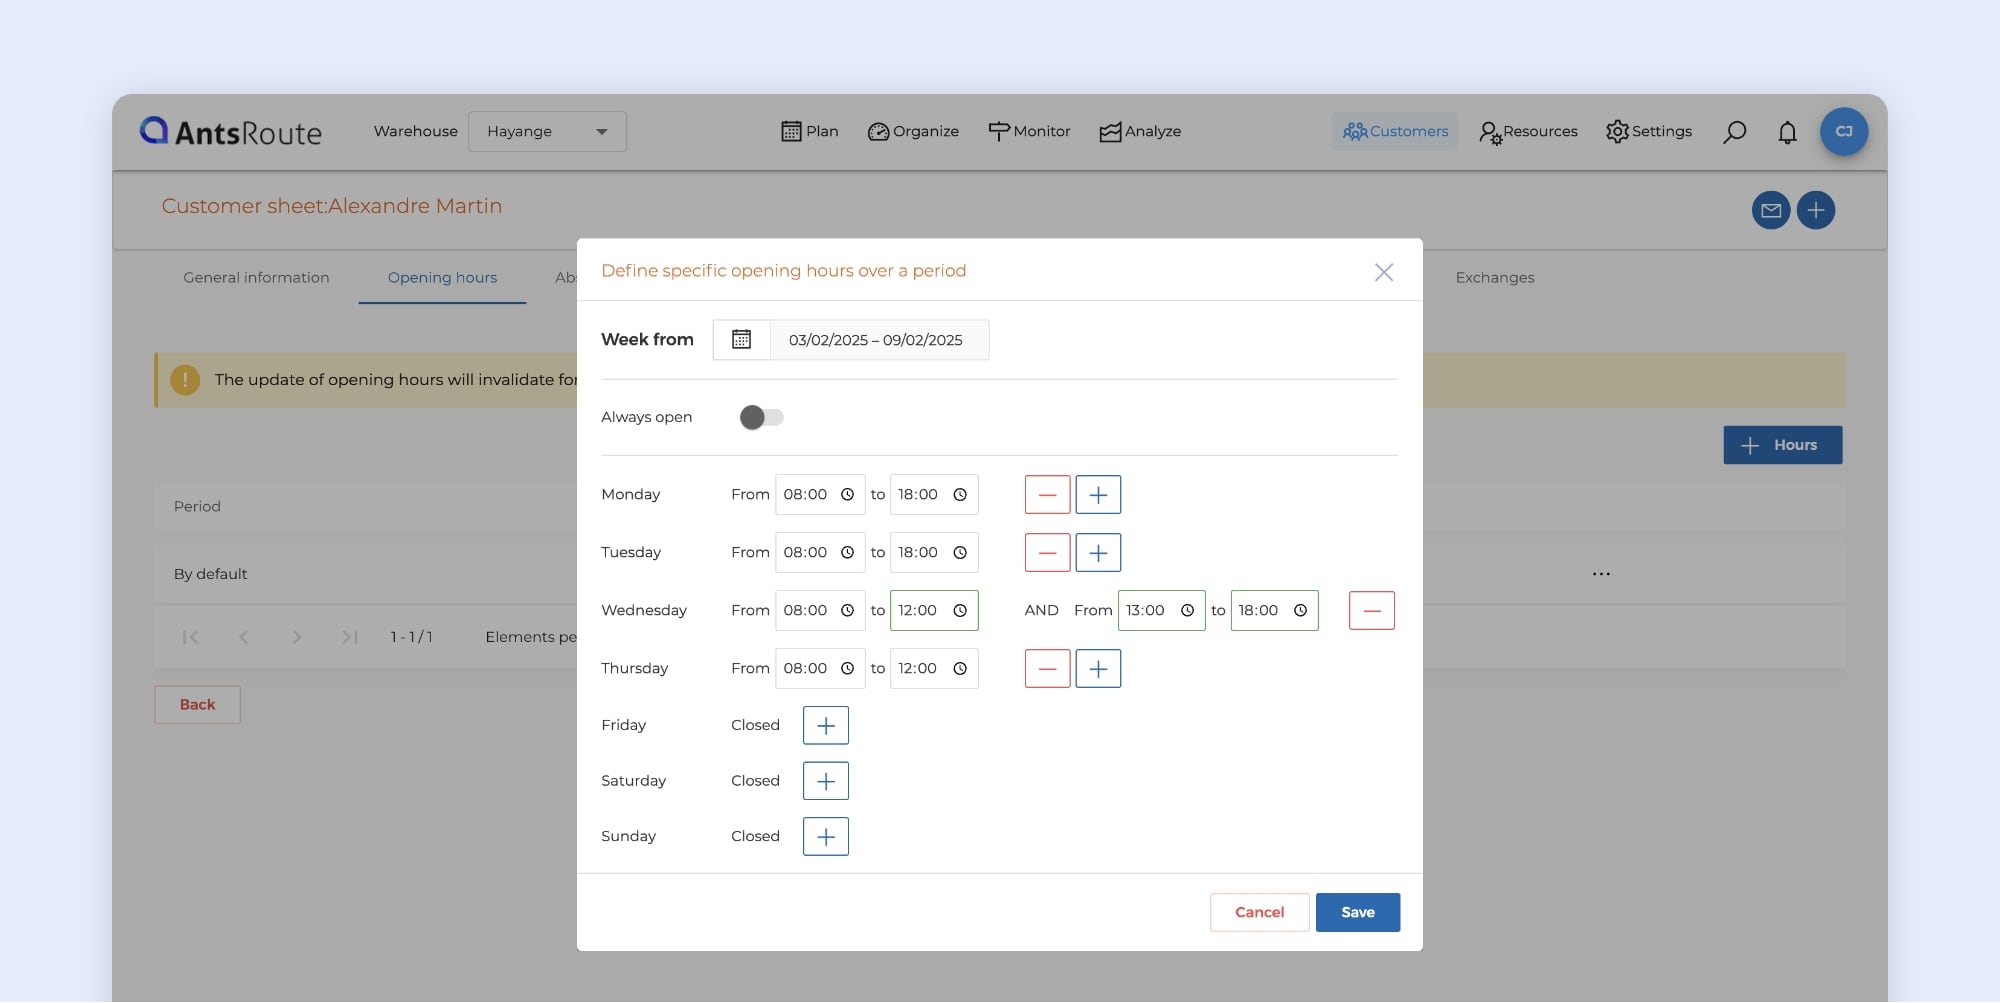
Configuring a customer’s opening hours on AntsRoute.
Booking site: add appointments to the basket of work orders
AntsRoute is evolving to offer you even greater flexibility! You’re already familiar with our online booking site, which allows your end customers to schedule a service at their home, 24 hours a day, 7 days a week. Until now, you had to choose a fixed date and the service was added directly to your agents’ schedules.
What’s new?
For users of the work order basket, it is now possible to let your customers choose a period of availability. The appointment request is then added to the work order basket, along with an availability date and a due date. You can then schedule the appointment at the right time by effectively grouping nearby appointments together, while respecting your time and business constraints. The result? Greater optimisation of your routes and improved customer satisfaction!
How do I activate this feature?
- From your AntsRoute interface:
- Go to ‘Settings’ > ‘Booking site’.
- Go to the ‘Service types’ tab.
- In the ‘Module for adding deliveries’ field, select the ‘Add deliveries in the “Deliveries basket” tab’ option.
- Click on ‘Save’.
- On the end customer side:
- From the booking site, your customers will be able to choose the type of service they require and fill in the information requested, including a desired time slot for the visit.
- If you have activated the option, your customers will also be able to define a period of availability before confirming their appointment.
- On the scheduler’s side:
- The appointment will be added to the basket of work orders as an order to be scheduled.
- You can then schedule the appointment according to availability. Once scheduled, the end customer will see the appointment marked as ‘Planned’ on their account, directly from the booking site. You can, of course, automate the sending of a notification to ask the customer to confirm the date finally chosen.
To learn more about this function, read our support article.
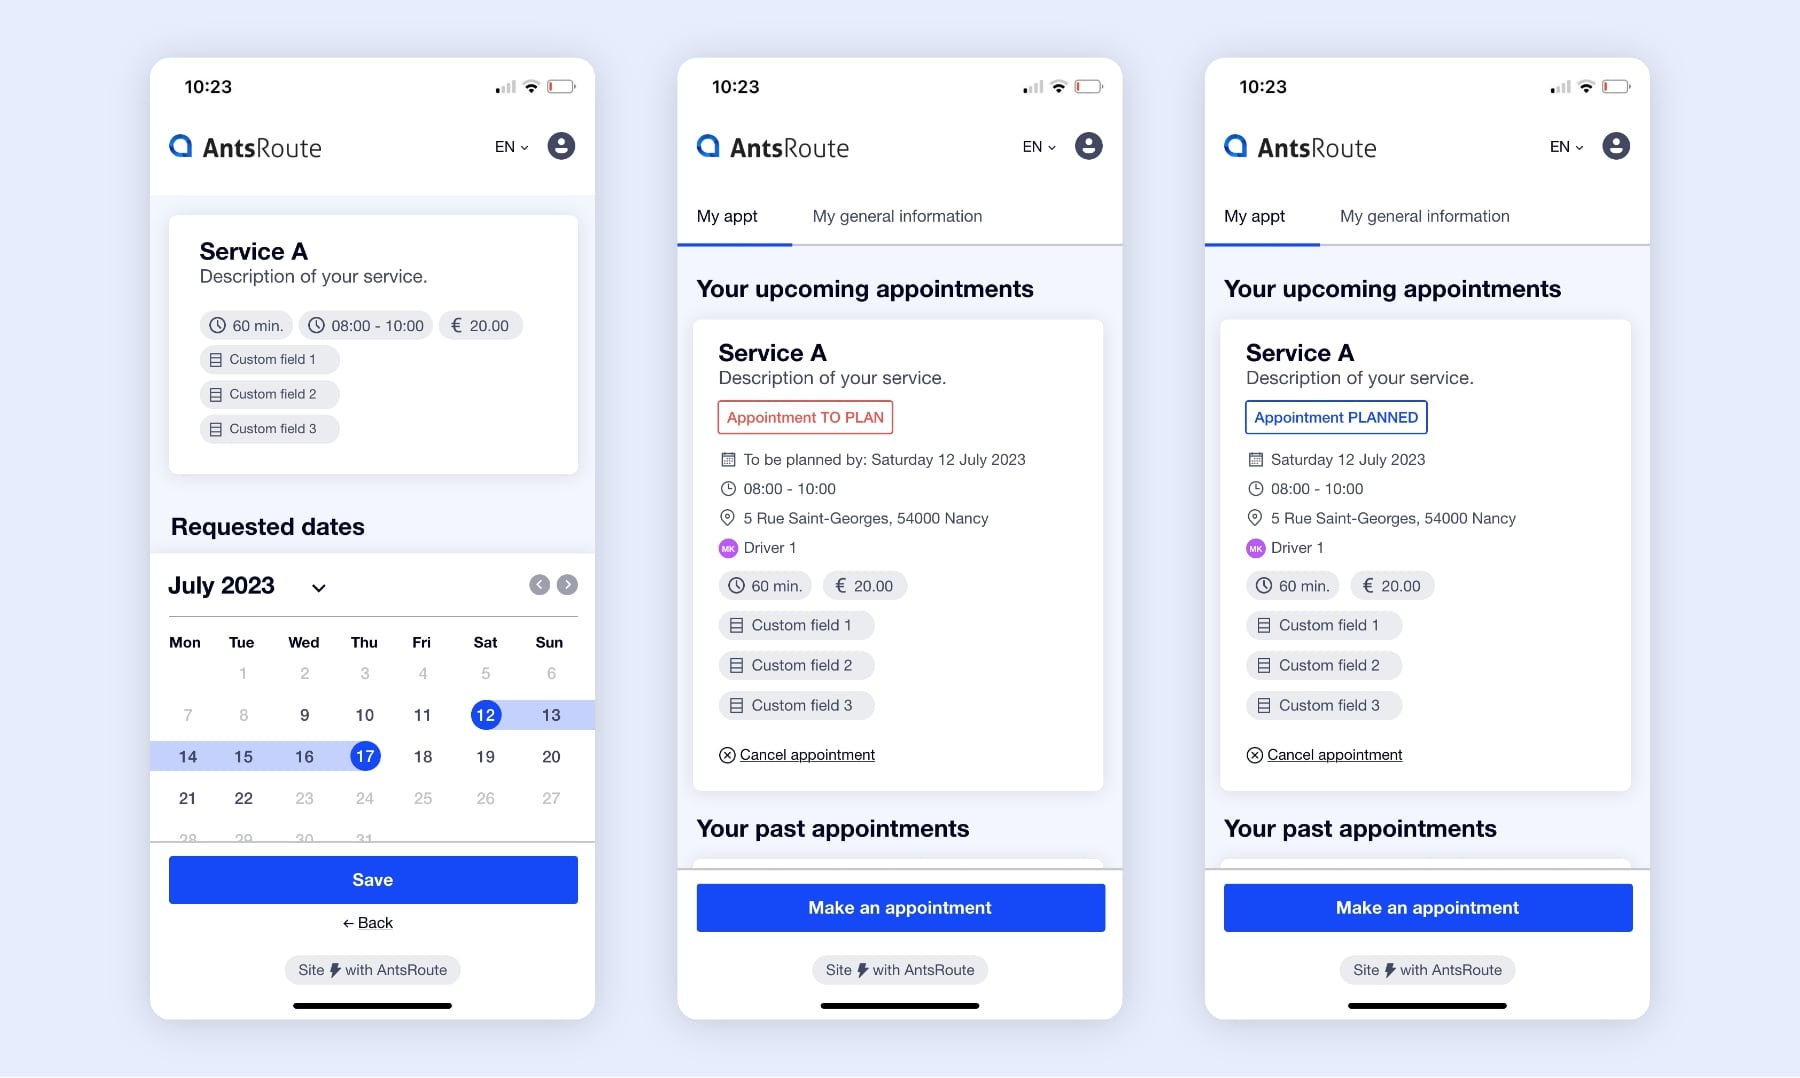
Adding an appointment to the basket of work orders from the booking site.
New ‘List of items’ tab for even more precise tracking
Good news for those who use the item database on AntsRoute! A brand new tab, entitled ‘List of items’, is now available in the ‘Monitor’ module.
What is it used for?
As a reminder, the items database allows you to list all the products offered by your company that your drivers deliver during their routes. This new tab gives you a clear, detailed overview of your products, with four key indicators:
- Deliveries done with items delivered in conformity
- Deliveries done with items delivered with anomalies
- Deliveries cancelled or done with items not delivered
- Ongoing deliveries
Note: In addition to the indicators already available in the ‘History of items’ tab of the analysis module, a new indicator, ‘Ongoing deliveries’, has been added. This groups together deliveries with the following status: ‘planned’, ‘confirmed’, ‘pending’, ‘postponed’ and ‘ongoing’.
You can view detailed information on your items at a glance: item status, item name, quantity, customer, delivery status and drivers assigned. It’s the perfect tool for getting a complete and accurate overview of your items and deliveries, while making it easy to track any anomalies.
How do I activate and use this feature?
- Activate the item database:
- Go to your AntsRoute account settings and activate the ‘Item database’ option.
- Add the items proposed by your company, specifying the necessary information (name, quantities, etc.).
- Plan your deliveries:
- When creating your routes, enter the items to be delivered and their quantities.
- Access item tracking:
- On the day of your deliveries, open the ‘Monitor’ module and access the ‘List of items’ tab.
- This is where you’ll find the data reported in real time by your drivers via the AntsRoute mobile application.
To learn more about this function, read our support article.
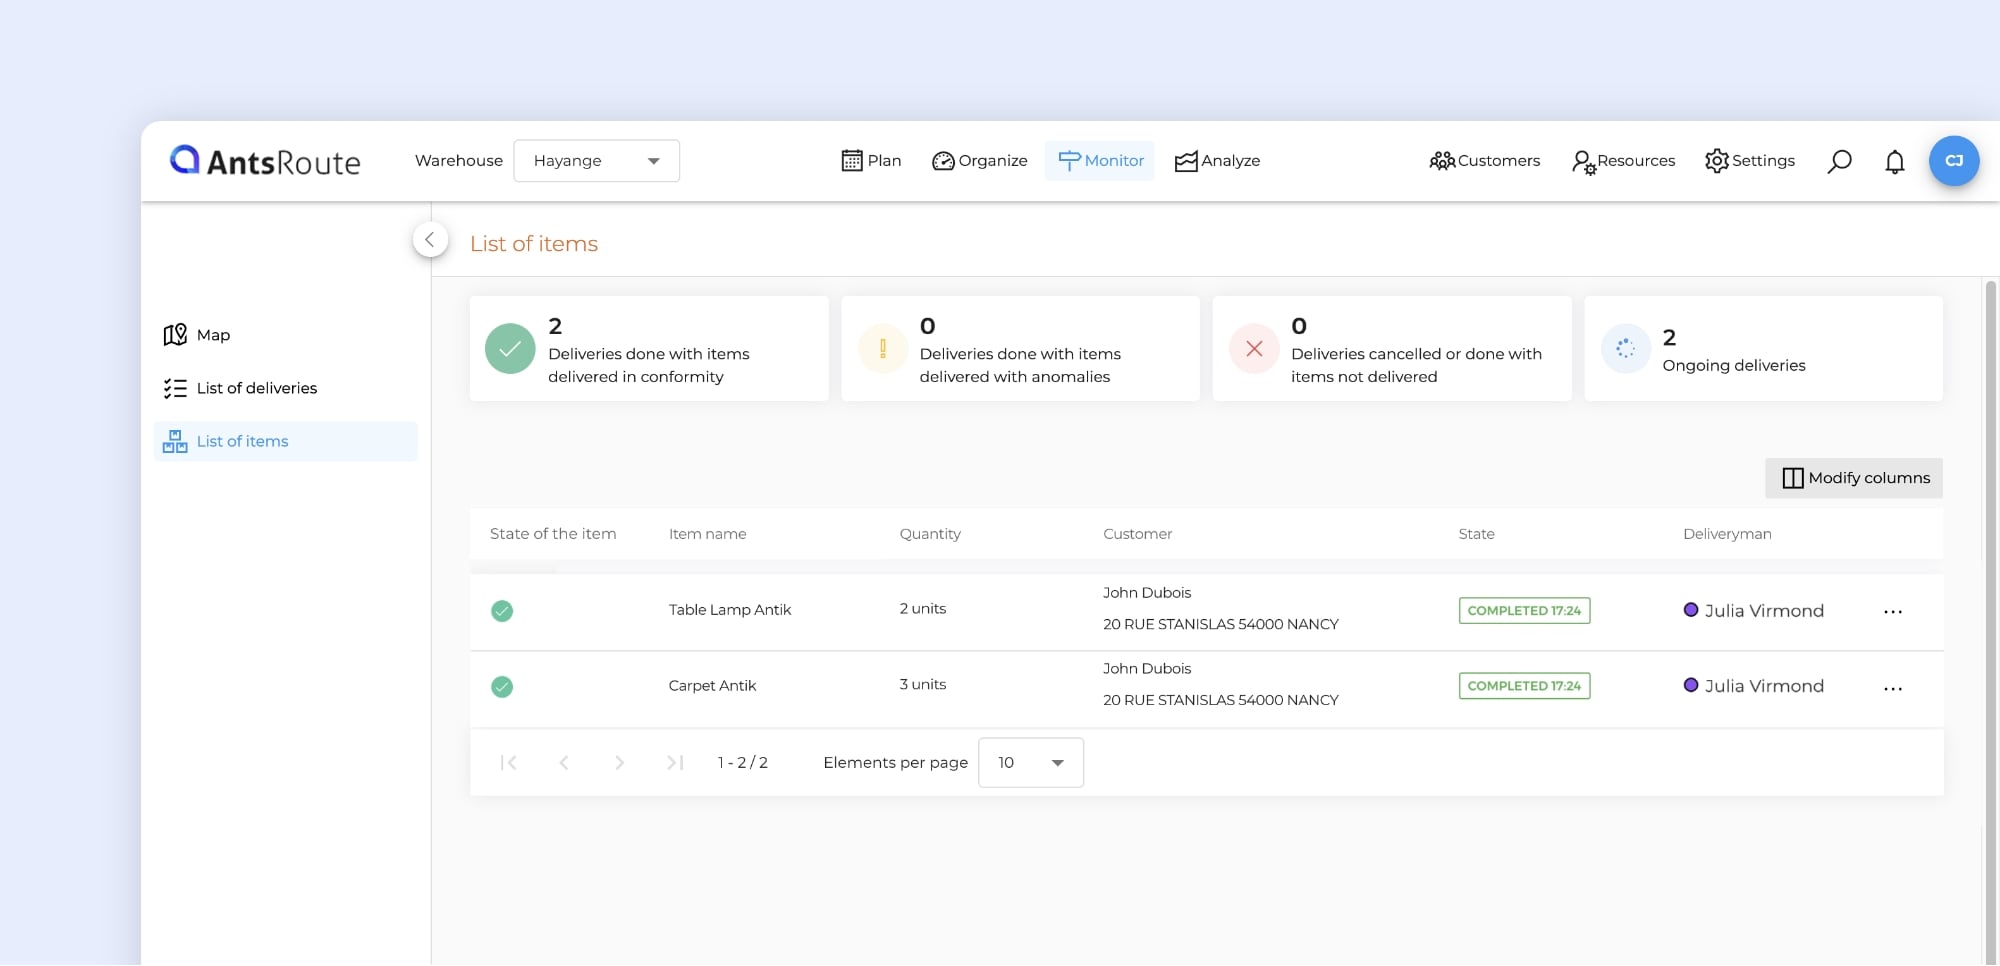
Tracking the delivery of items on AntsRoute.
New sectorisation option: flexible or strict mode
If you’re using our sectorisation feature, we’ve got good news for you! From now on, you can choose whether or not to authorise the planning of work orders outside the defined sectors. When creating a sector plan, you can choose between two modes:
- Flexible mode: out-of-sector customers are automatically assigned to the nearest working area.
- Strict mode: work orders for out-of-sector customers remain unassigned.
No more complicated tricks! Previously, some users would draw a ‘false’ sector around the other sectors without assigning drivers to ensure that out-of-sector work orders remained in the ‘unassigned’ status. Thanks to this new feature, everything is now much simpler: in just two clicks, you can select the strict sectorisation mode, and that’s it!
How do I activate this feature?
- Activate sectorisation:
- If you haven’t already done so, go to your AntsRoute account settings and activate the sectorisation function.
- Create a sector plan:
- Go to the ‘Sectorisation’ tab.
- Click on ‘+’ to add a new sector plan.
- Give your plan a name and select the desired mode: flexible or strict.
- Define the days on which your plan will apply, then click on ‘Save’.
An improvement to come! We’re also working on redesigning the sectorisation function. Soon you’ll be able to take advantage of an optimised design and an even more intuitive user experience to help you manage your sectors with ease.
To learn more about this function, read our support article.
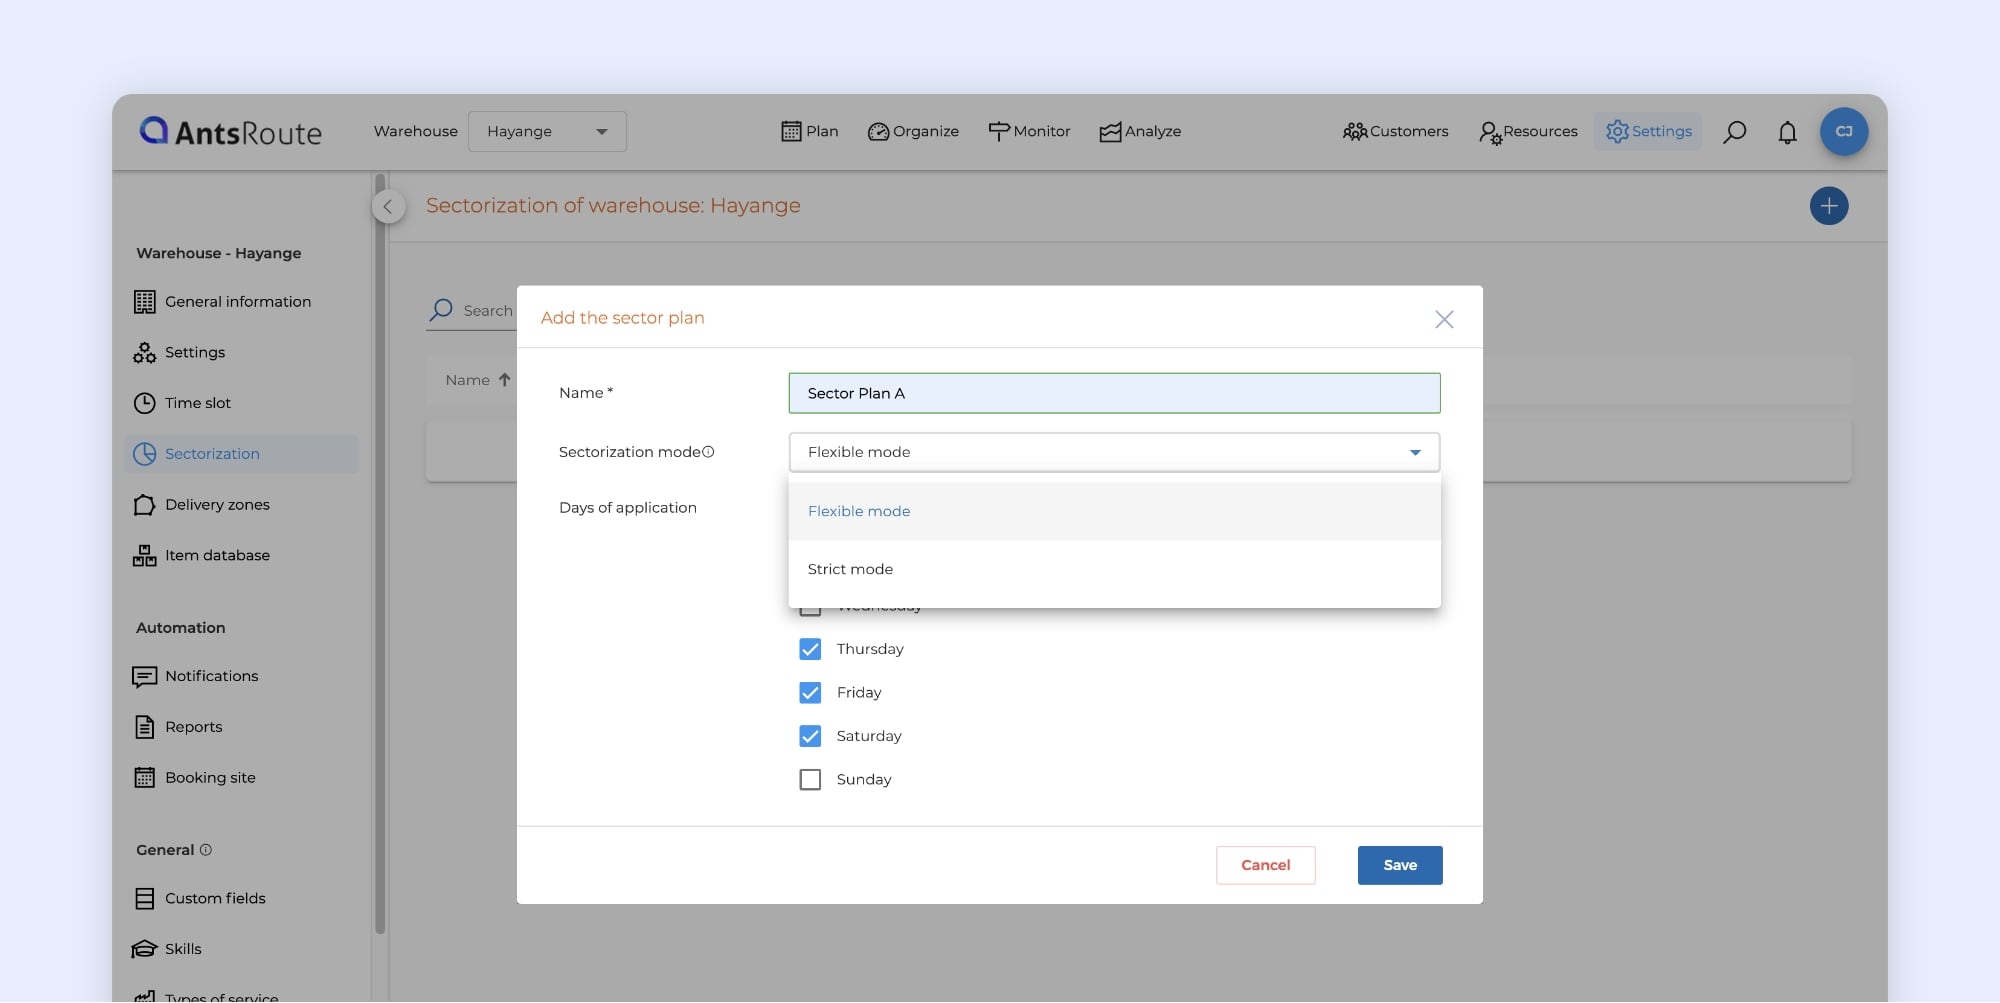
Flexible and strict sectorisation on AntsRoute.
Display work order and item prices on the mobile application
Good news for users of our price calculation system! You can now authorise your drivers and field technicians to view the price of work orders and items directly from the mobile application.
How do I activate this function?
- Go to the ‘Settings’ module > ‘Mobile application settings’.
- Enable the option ‘Activate price display for items and/or work orders’.
- Click on ‘Save’ to confirm.
Once this option has been activated, your drivers will be able to check prices directly in the ‘Work order details’ tab of the mobile application.
To learn more about this function, read our support article.
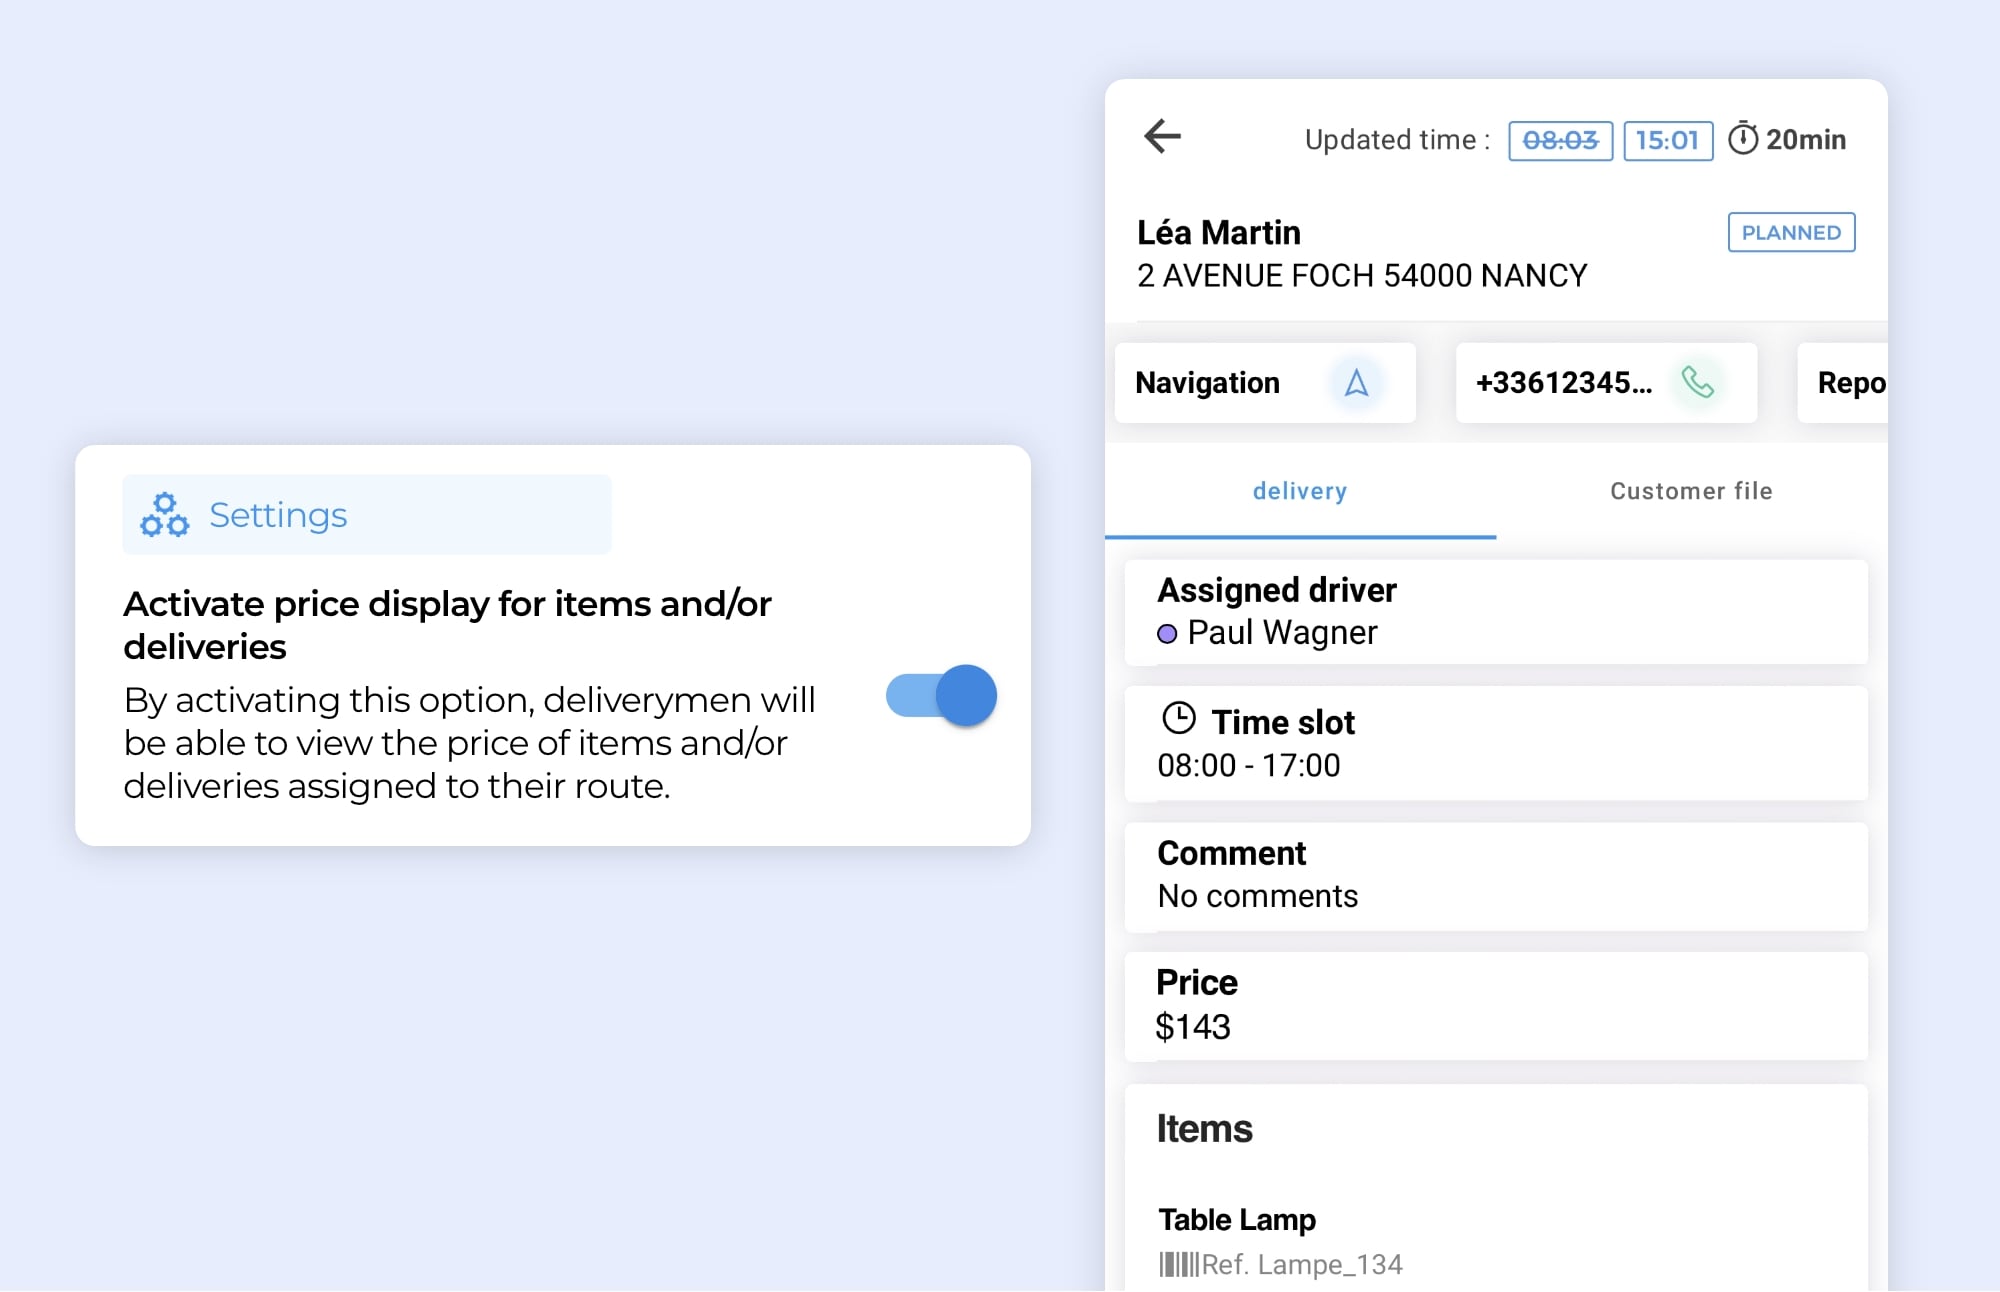
The display of work order prices on the mobile application.
To give you even greater flexibility in planning your routes, we’ve added a new feature that lets you limit the addition of tasks according to the extra distance to be covered.
In your account settings, you can now define a maximum authorised distance in kilometres for adding work orders to an existing route. There are two separate settings for this option:
- Maximum authorised distance for adding a first work order: AntsRoute will not offer any availability if the additional distance for adding the first work order exceeds the defined limit.
- Maximum distance authorised for adding extra work orders: AntsRoute will not allow a work order to be added if the extra distance to be covered exceeds the defined limit.
How do I activate this option?
- Go to ‘Settings’ > ‘Optimisation settings’.
- Define the maximum distances allowed for adding work orders.
- Don’t forget to ‘Save’ your changes.
To learn more about this function, read our support article.
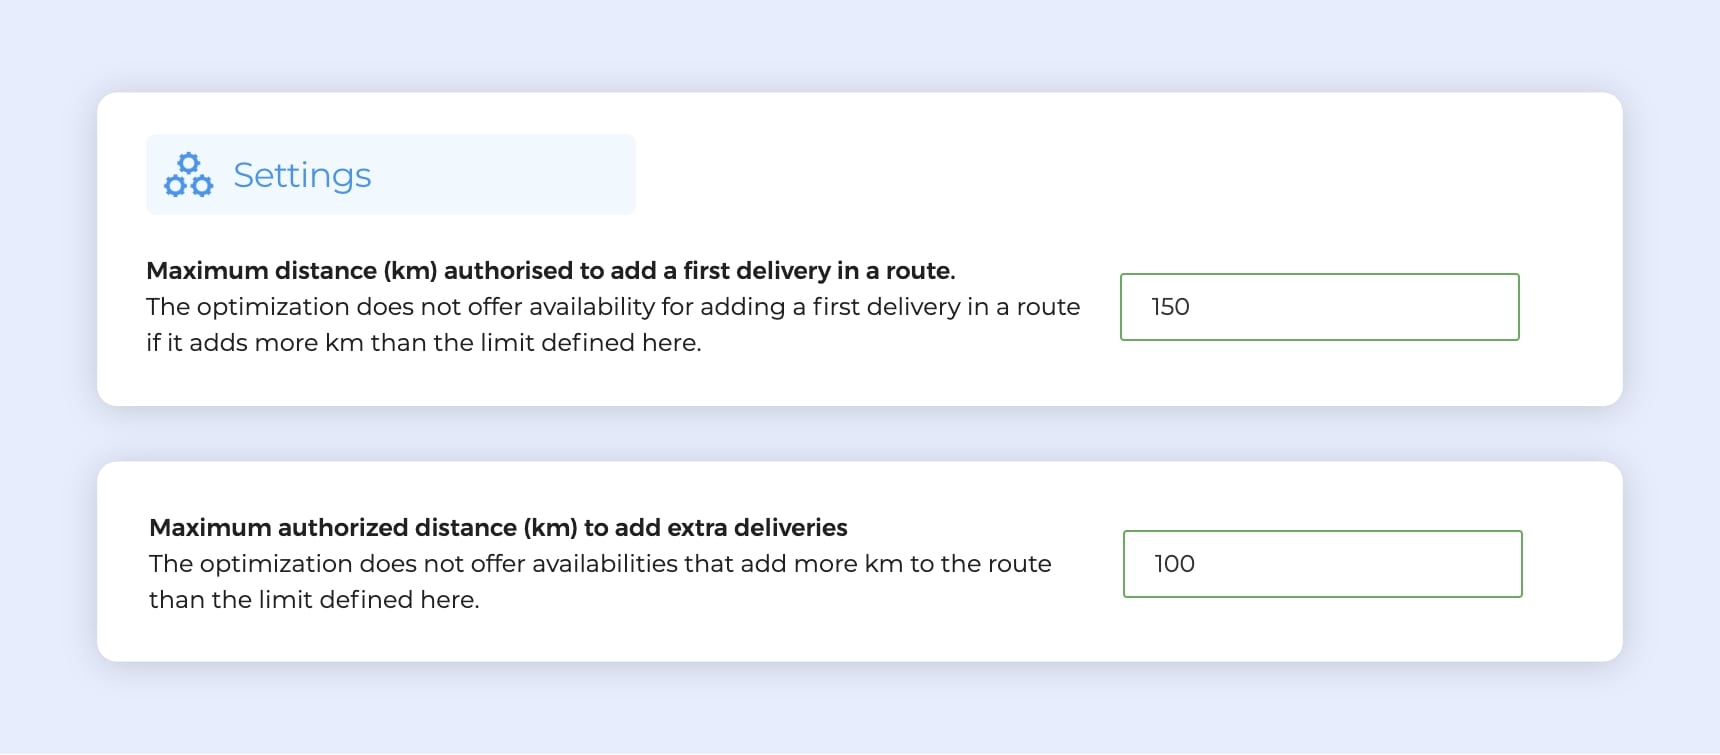
Maximum authorised distance for adding a work order.
Good news for users who define user roles on AntsRoute! You can now authorise or limit the display of work order and route prices according to the role assigned to each user. With this feature, you can control who in your team can access pricing information.
How do I activate this option?
- Click on ‘My account’ at the top right of the interface.
- Go to the ‘Roles’ section.
- Add a new role or modify an existing role.
- In the ‘Manage the deliveries’ section, activate or deactivate the ‘View prices of deliveries and routes’ option and save your changes.
To learn more about this function, read our support article.
New entry points available on our API
Our API is evolving to meet your needs even better! You can now access new entry points, specifically dedicated to the loading and unloading stages (pickup & delivery).
Here’s the new data available:
- Date of completion of a loading (or unloading) step
- Comments on the completion of a loading (or unloading) step
- Date of cancellation of a loading (or unloading) step
- Reason for the cancellation of a loading (or unloading) step
Do you have any questions? Don’t hesitate to contact our support team by filling in our contact form. We would be delighted to help you!
WRITTEN BY

Marie Henrion
At AntsRoute, Marie has been the marketing manager since 2018. With a focus on last-mile logistics, she produces content that simplifies complex topics such as route optimization, the ecological transition, and customer satisfaction.
Optimise your Routes Today
Free 7-day trial | No credit card required
Contenu
- Display breaks in ongoing routes and on the mobile application
- Define geographical zones with constraints
- Customise customer opening hours for specific dates
- Booking site: add appointments to the basket of work orders
- New ‘List of items’ tab for even more precise tracking
- New sectorisation option: flexible or strict mode
- Display work order and item prices on the mobile application
- Define a maximum authorised distance for adding a work order
- User role: authorise display of route and work order prices
- New entry points available on our API
- Optimise your Routes Today