March 2024: What’s new in AntsRoute?
Blog > Product updates > March 2024: What’s new in AntsRoute?
March 2024: What’s new in AntsRoute?
Published on 25 March 2024 • Reading time: 6 min read
The AntsRoute team has been working hard over the last few weeks to bring to life the features you’ve been asking for. Ready to find out what’s new? We’ll explain it all to you.
Table of contents
- The item database offers two new functions
- Report the absences of your customers
- Plan remote work orders
- Reposition a work order within an ongoing route
- Week view of your routes, displayed by route name
- Duplicate a named route
The item database offers two new functions
The item database allows you to add to AntsRoute all the items that your company offers and that your drivers deliver during their routes. If you’re not already using this function, you’ll have to take the plunge after reading our article.
With this function, you can indicate the quantities of items to be delivered to your customer when planning a delivery.
During deliveries, drivers can determine whether items have been delivered in conformity, delivered with anomalies or not delivered. If the option is activated, they can indicate the quantities of items actually delivered. The function also allows you to ask your drivers to fill in additional fields depending on the status of the item previously selected.
Once deliveries have been made, you can access a history of the items delivered. This option is particularly useful for quickly rescheduling the delivery of undelivered items.
To take things even further, our teams have just developed two new functions. Firstly, you can now insert a table of delivered items in the reports you send to your customers by SMS or e-mail.
The table of items is automatically generated and contains the following fields:
- Name
- Reference
- Quantity
- Quantity delivered
- Unit
- State of the item
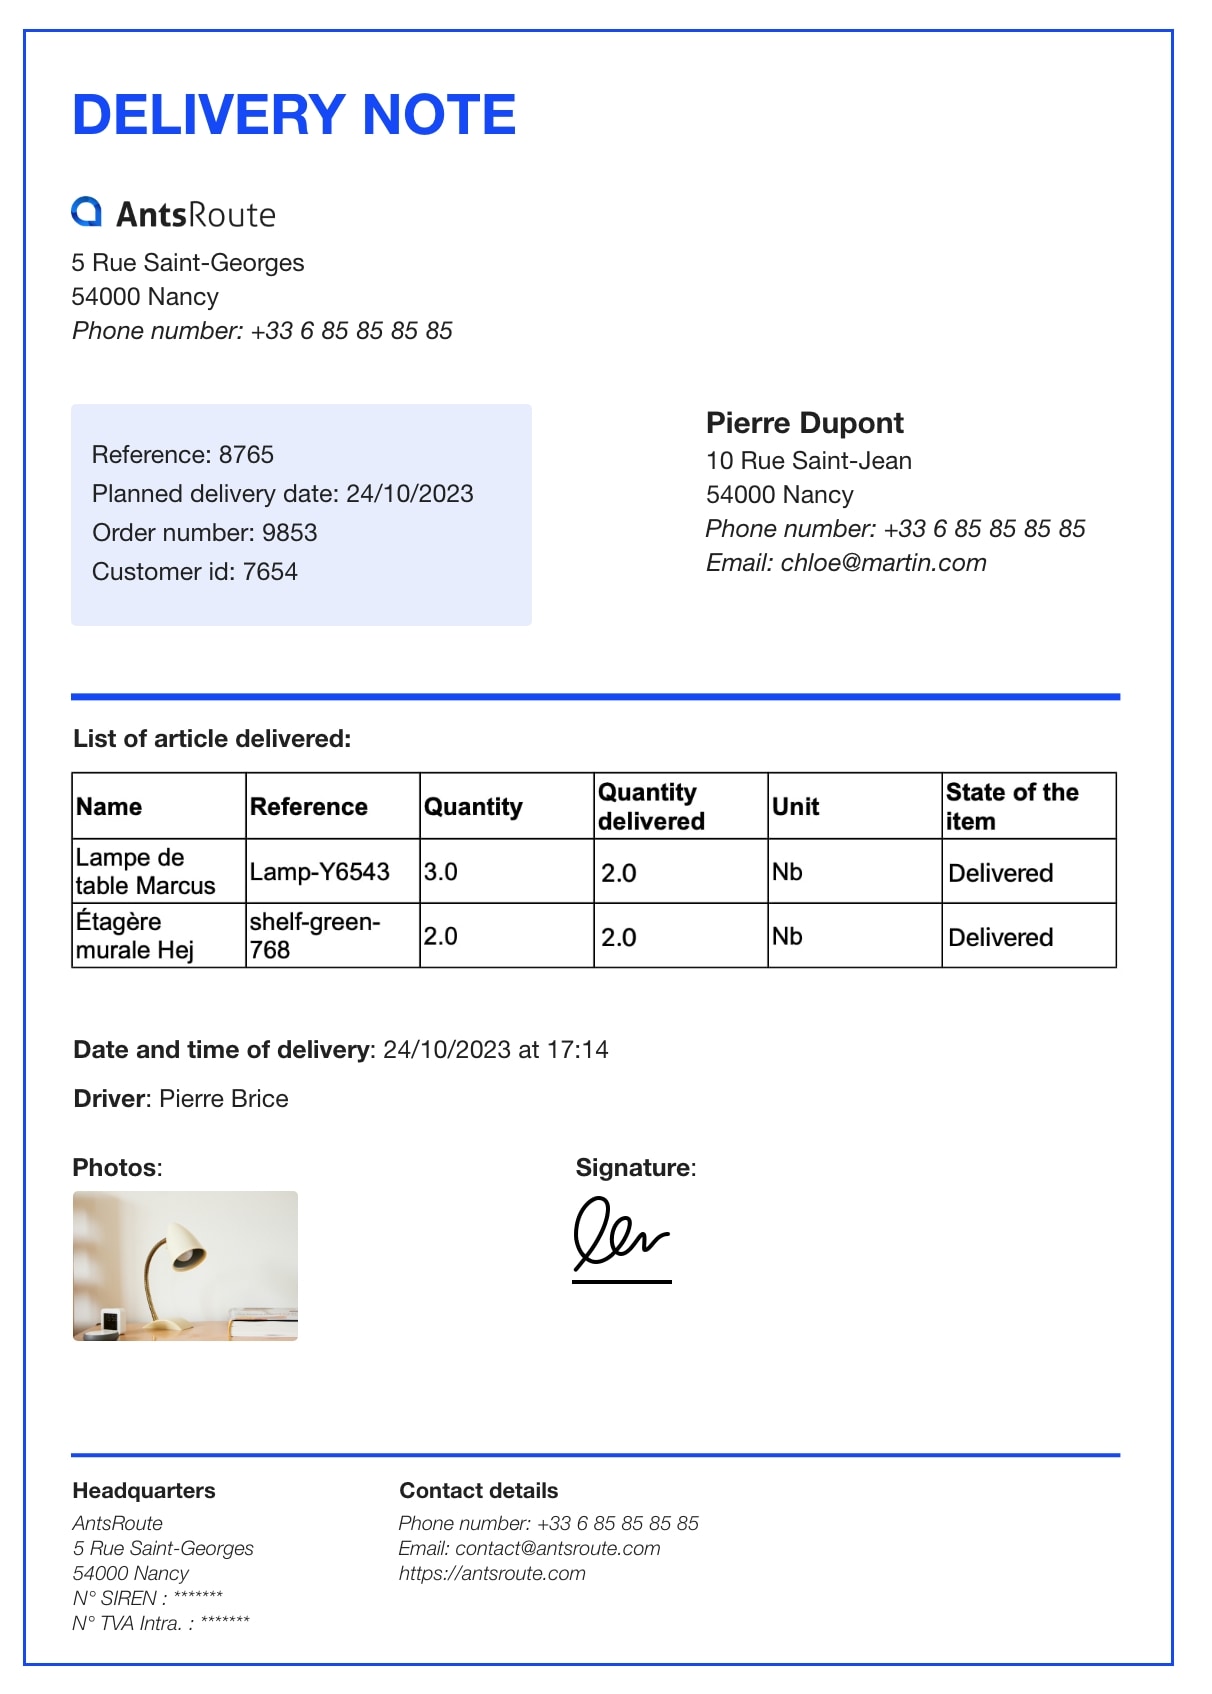
Table of items delivered in the AntsRoute report.
How it works?
Go to the “Settings” module > “Reports”. From this page, you can modify an existing report or create your first one. Insert the “Table of items” variable in the content. Finalise the report configuration and save the changes.
There’s another new function: you can now determine the unit of an item. For example, “nbr”, “pce”, “pcs”, etc.
To learn more about managing an item database, read our support article.
Report the absences of your customers
To meet your needs, our developers have just added a function enabling you to report your customers’ or patients’ absences. This function is particularly useful if you regularly visit the same customers and schedule regular appointments. In practical terms, by reporting a customer as “absent”, you avoid planning appointments at their home during that period of absence. This reduces the number of missed appointments, which are particularly costly for your business and for the environment.
How it works?
From the “Customer sheet”, go to the “Absences” tab. From this page, simply click on the “Add an absence” button. Enter a “Start date” and an “End date” for the absence. Another option: if necessary, you can add a “Reason for absence”. And that’s it!
To learn more about the management of your customers’ absences, read our support article.
Plan remote work orders
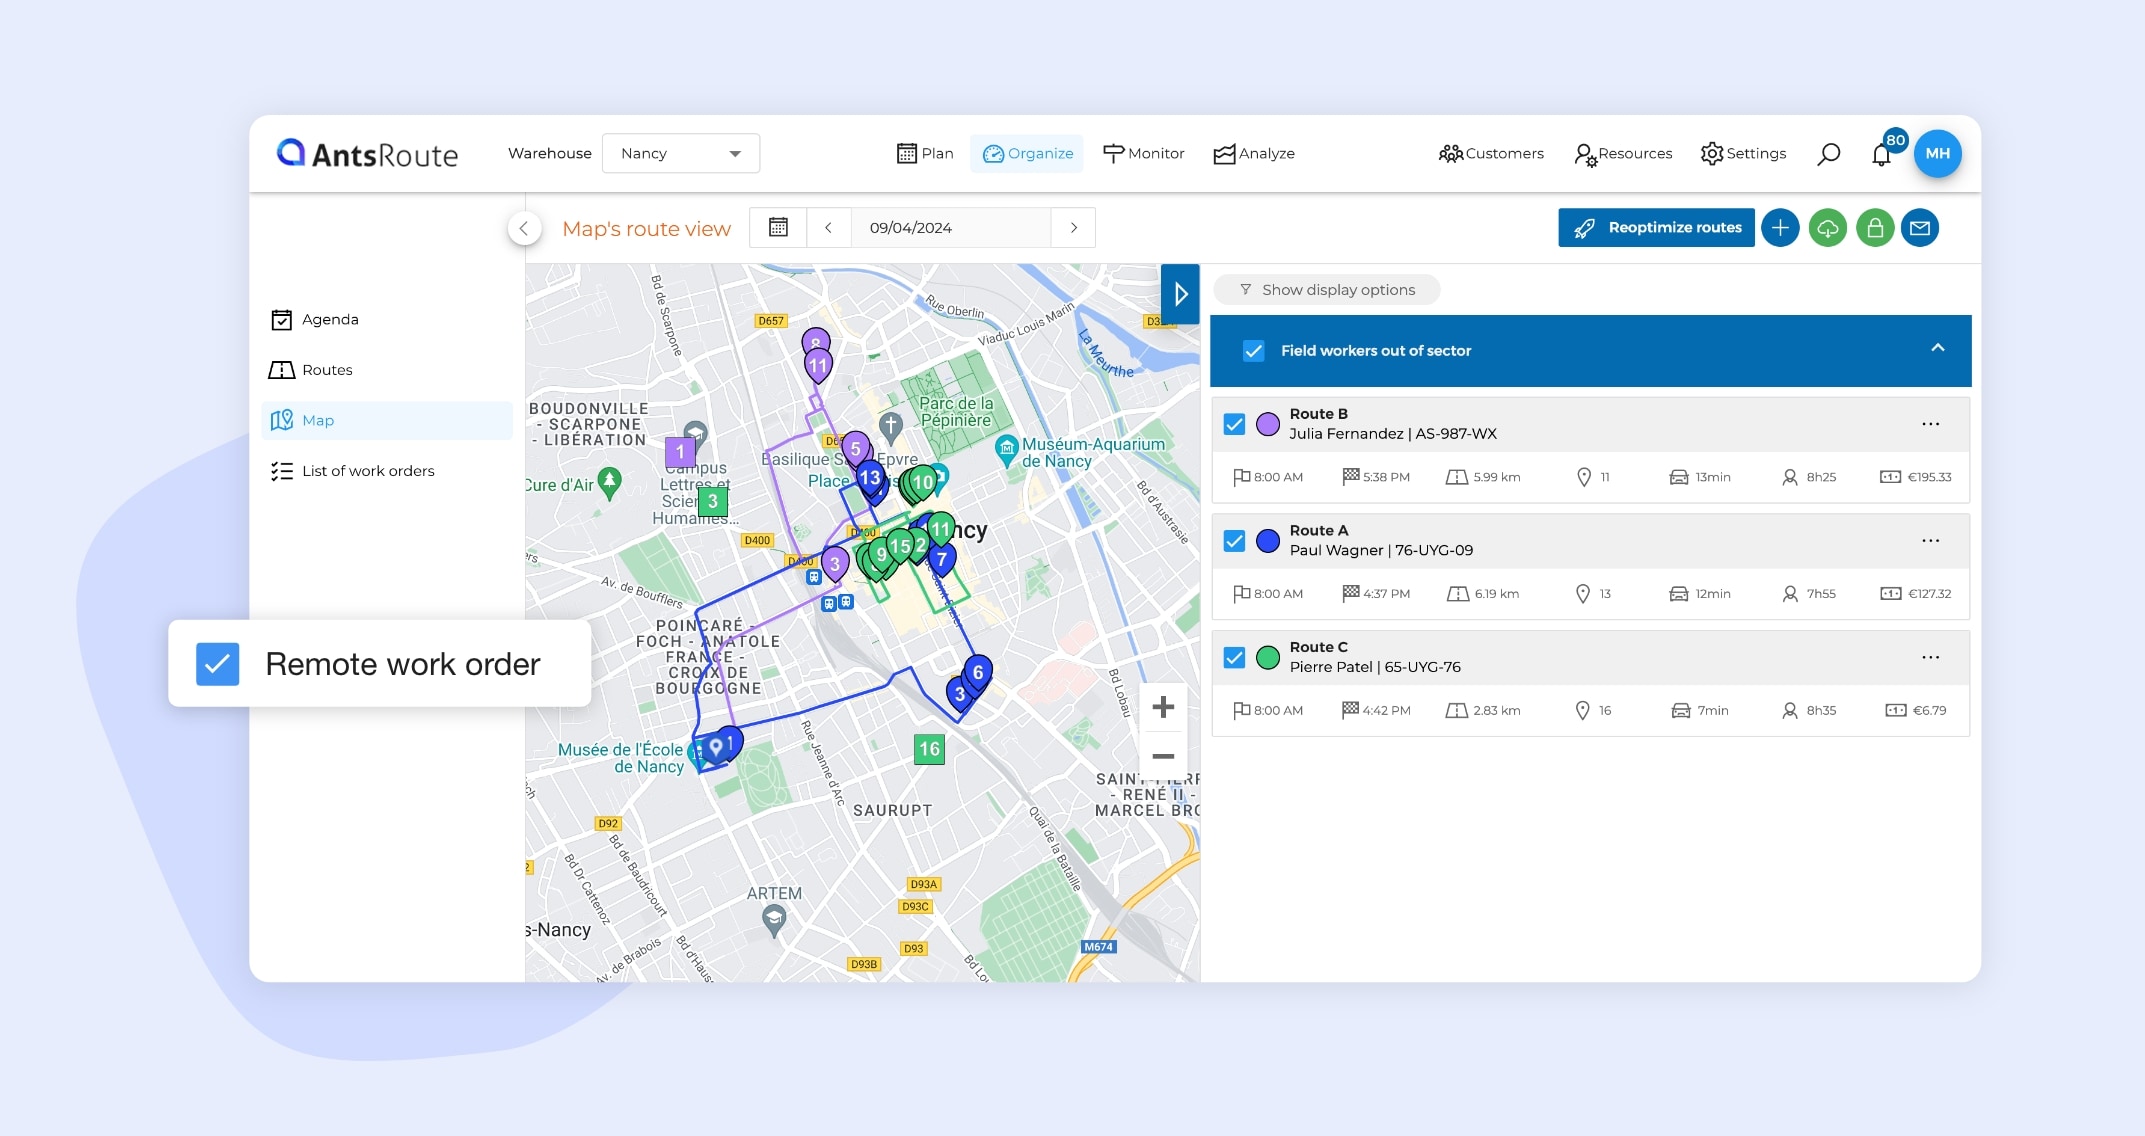
Here’s a new feature that should be very useful to healthcare and field service companies. Our users can now schedule remote appointments, i.e. without visiting the customer’s home. For example, remote monitoring, remote visits, remote administration, remote consultations, etc. The remote work orders benefit from speed and lower travel costs.
How it works?
First, you need to go to the “General settings” tab in the “Settings” module to activate the “Remote work orders” option. Once you’ve done this, when you add an appointment, you’ll see a new “Location of work order” field. Simply select the “Remote work order” option. The work order will then be added to your route without any additional travel time.
Note: The remote work orders are displayed as a square in the “Map” tab.
To learn more about the planning of remote work orders, read our support article.
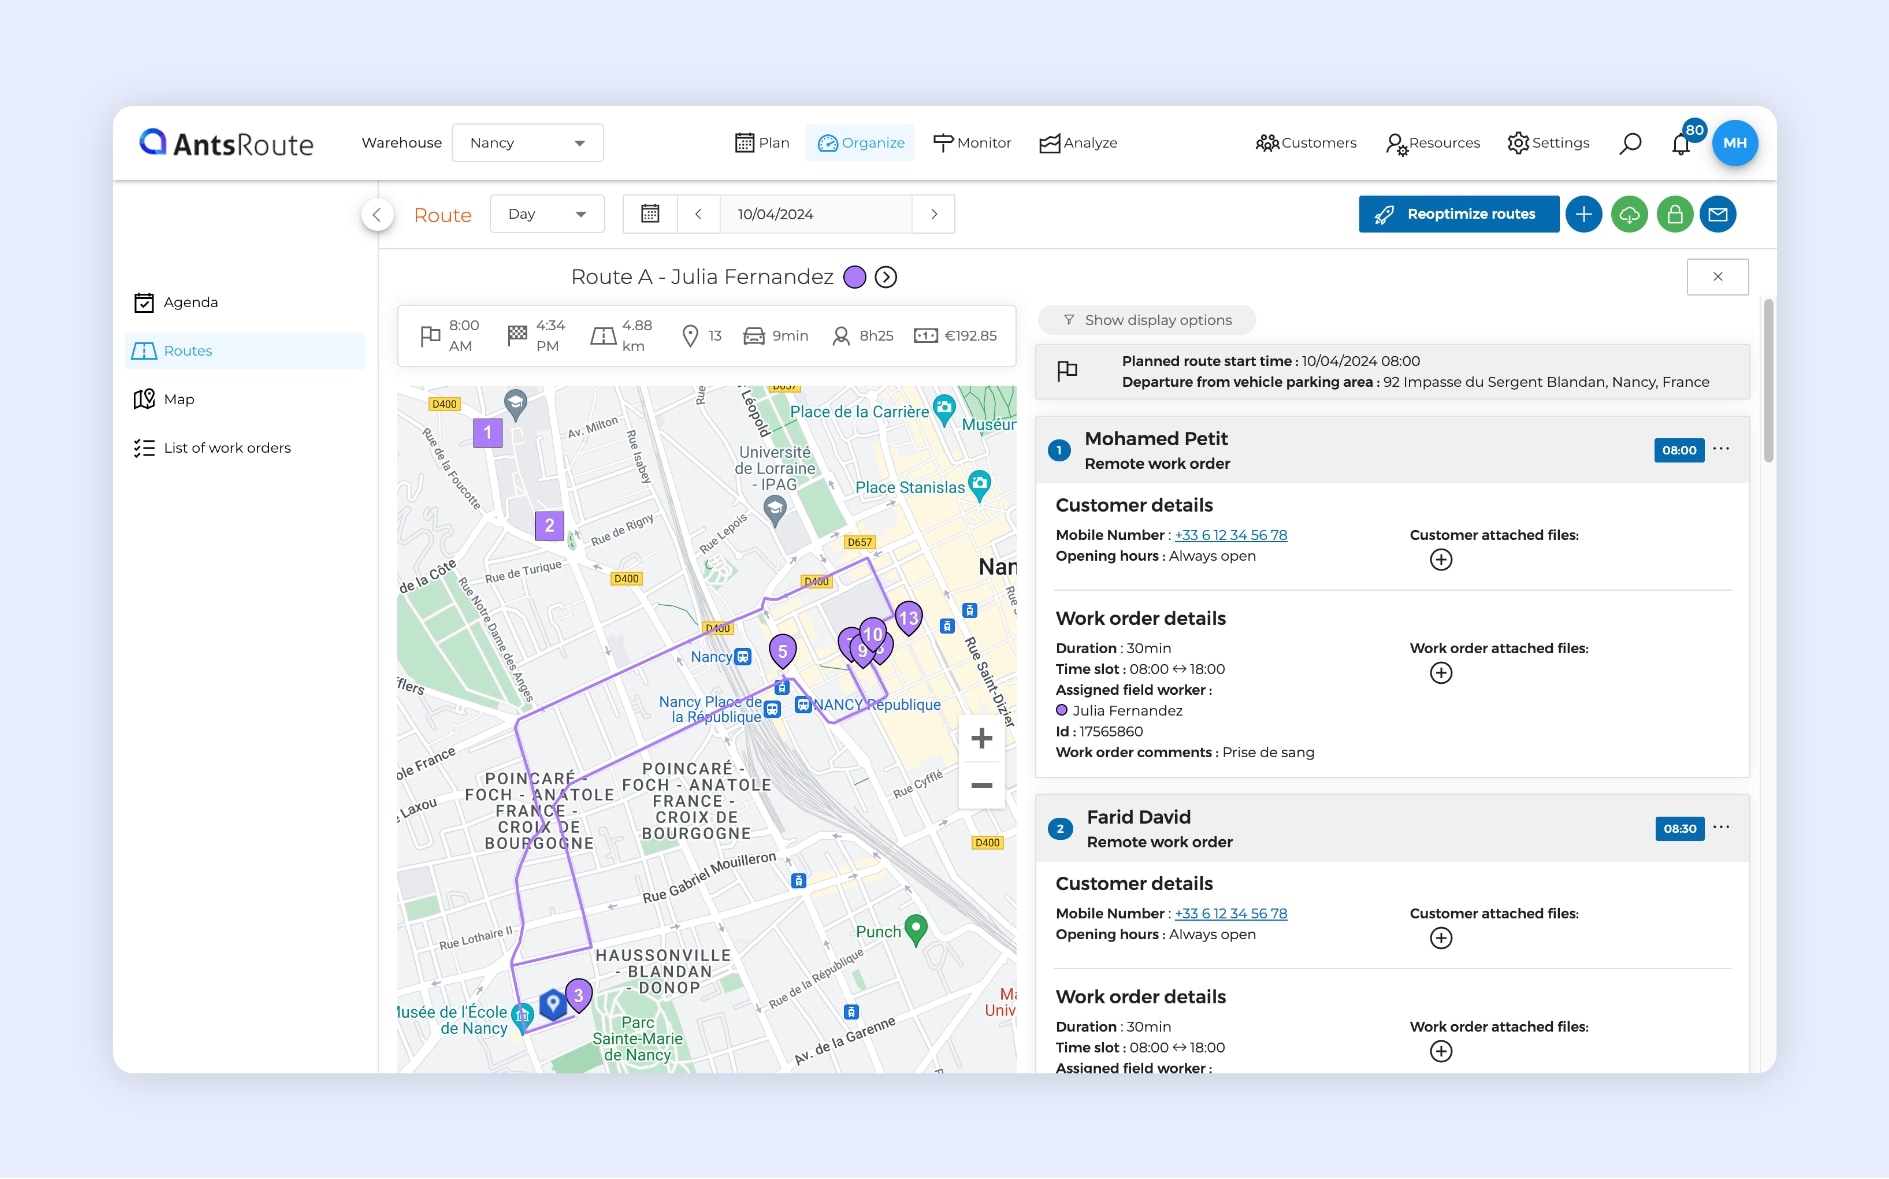
Planning remote work orders on AntsRoute.
Reposition a work order within an ongoing route
AntsRoute already had the function that lets you reposition a work order to a specific position within a route that hasn’t started. But now you can do the same thing in a route that’s already started.
This function is particularly useful if one of your customers tells you that he won’t be there at the scheduled time. Until now, you could only move the appointment to the end of the route. Thanks to this new feature, you can now move this appointment to the desired position in the route.
How it works?
Go to the “Monitor” module > “Map”. Display your driver’s route from the panel on the right. Identify the work order and click on “…” > “Reposition”. All you have to do now is enter the new position (positive integer) of this order in the route.
To learn more about this function, read our support article.
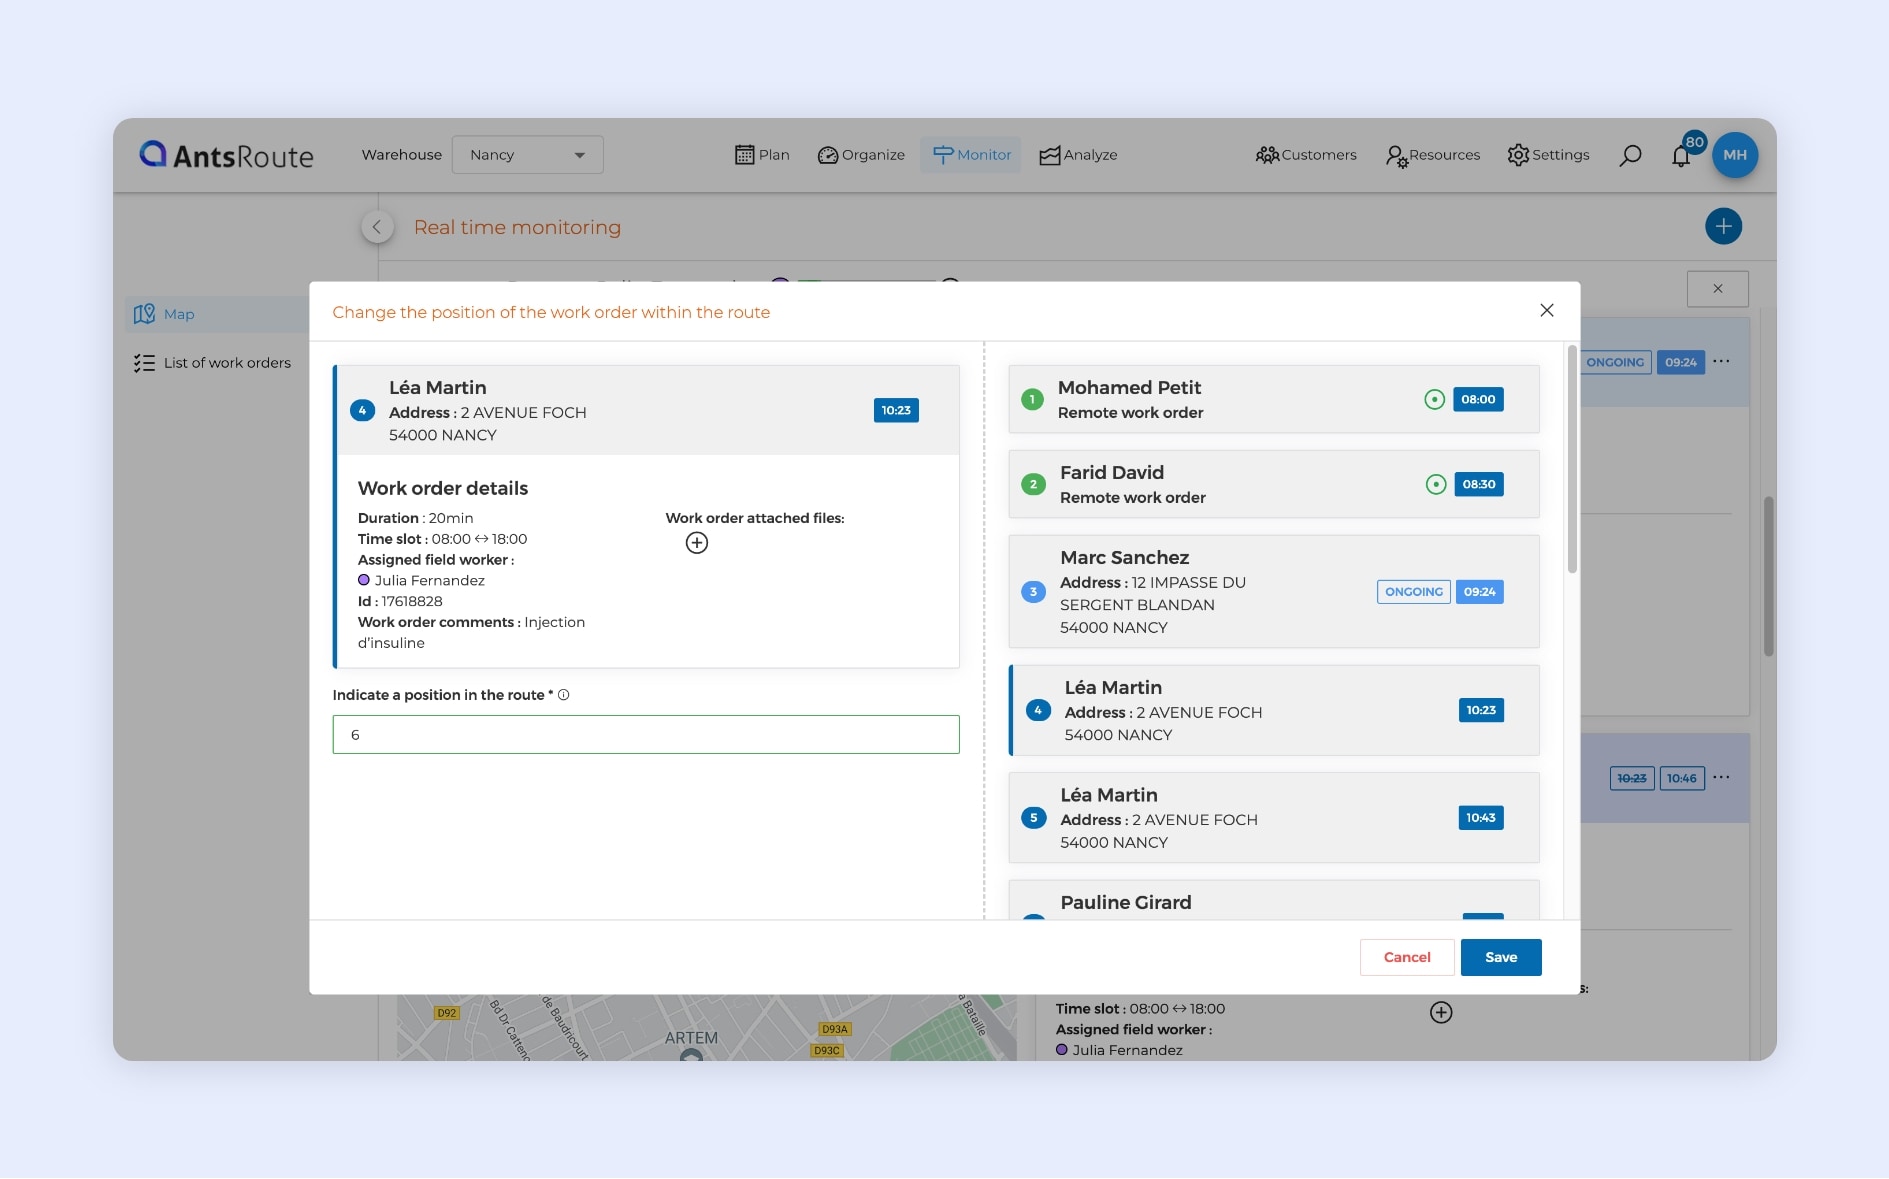
Reposition a work order within an ongoing route on AntsRoute.
Access the week view of your routes, displayed by route name
For several months now, AntsRoute has been giving you access to a weekly view of your routes, with a display by driver. To meet the needs of our customers who make regular routes and use our function to name routes, we have just added a new function. You can now access a weekly view of your routes, with a display by route name.
How it works?
Go to the “Organise” module > “Routes”. From this page, select the “week” route display option and choose a period from the calendar. Click on the button with the “text typing” icon. For each of the routes you have named, you can view the drivers who will be assigned to complete them on each day of the week.
☝️ Good to know: You can switch routes between two drivers simply by dragging and dropping.
To learn more about this function, read our support article.
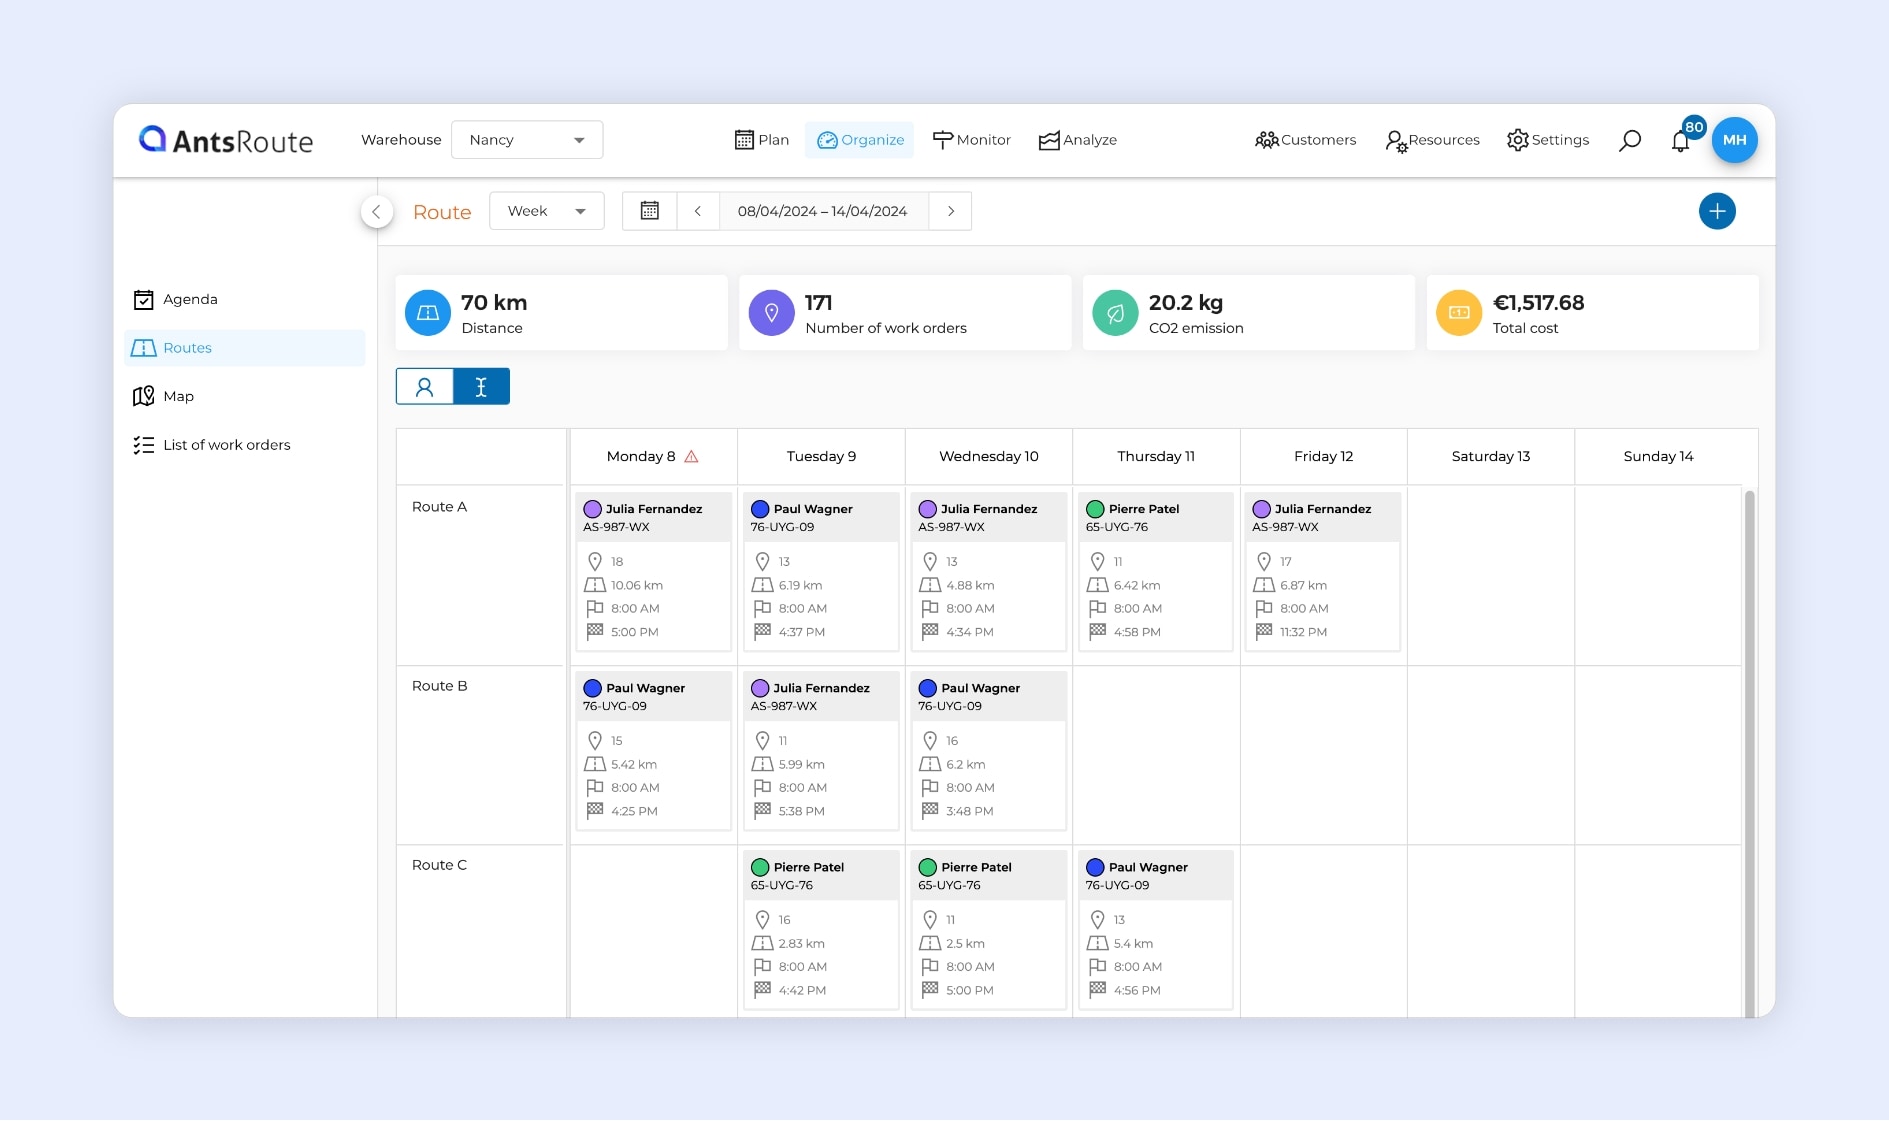
The week view of routes, displayed by route name on AntsRoute.
Duplicate a named route
AntsRoute now allows its users to duplicate a named route. This feature is useful for users who plan regular routes that are not always assigned to the same drivers. You can now duplicate a named route on another date or on certain days of the week over a given period.
How it works?
Start by going to the “Routes” tab of the “Organise” module. Identify a named route and click on “…” > “Duplicate the route”. Select a period and the days of application. You can also duplicate ongoing and completed routes.
To learn more about this function, read our support article.
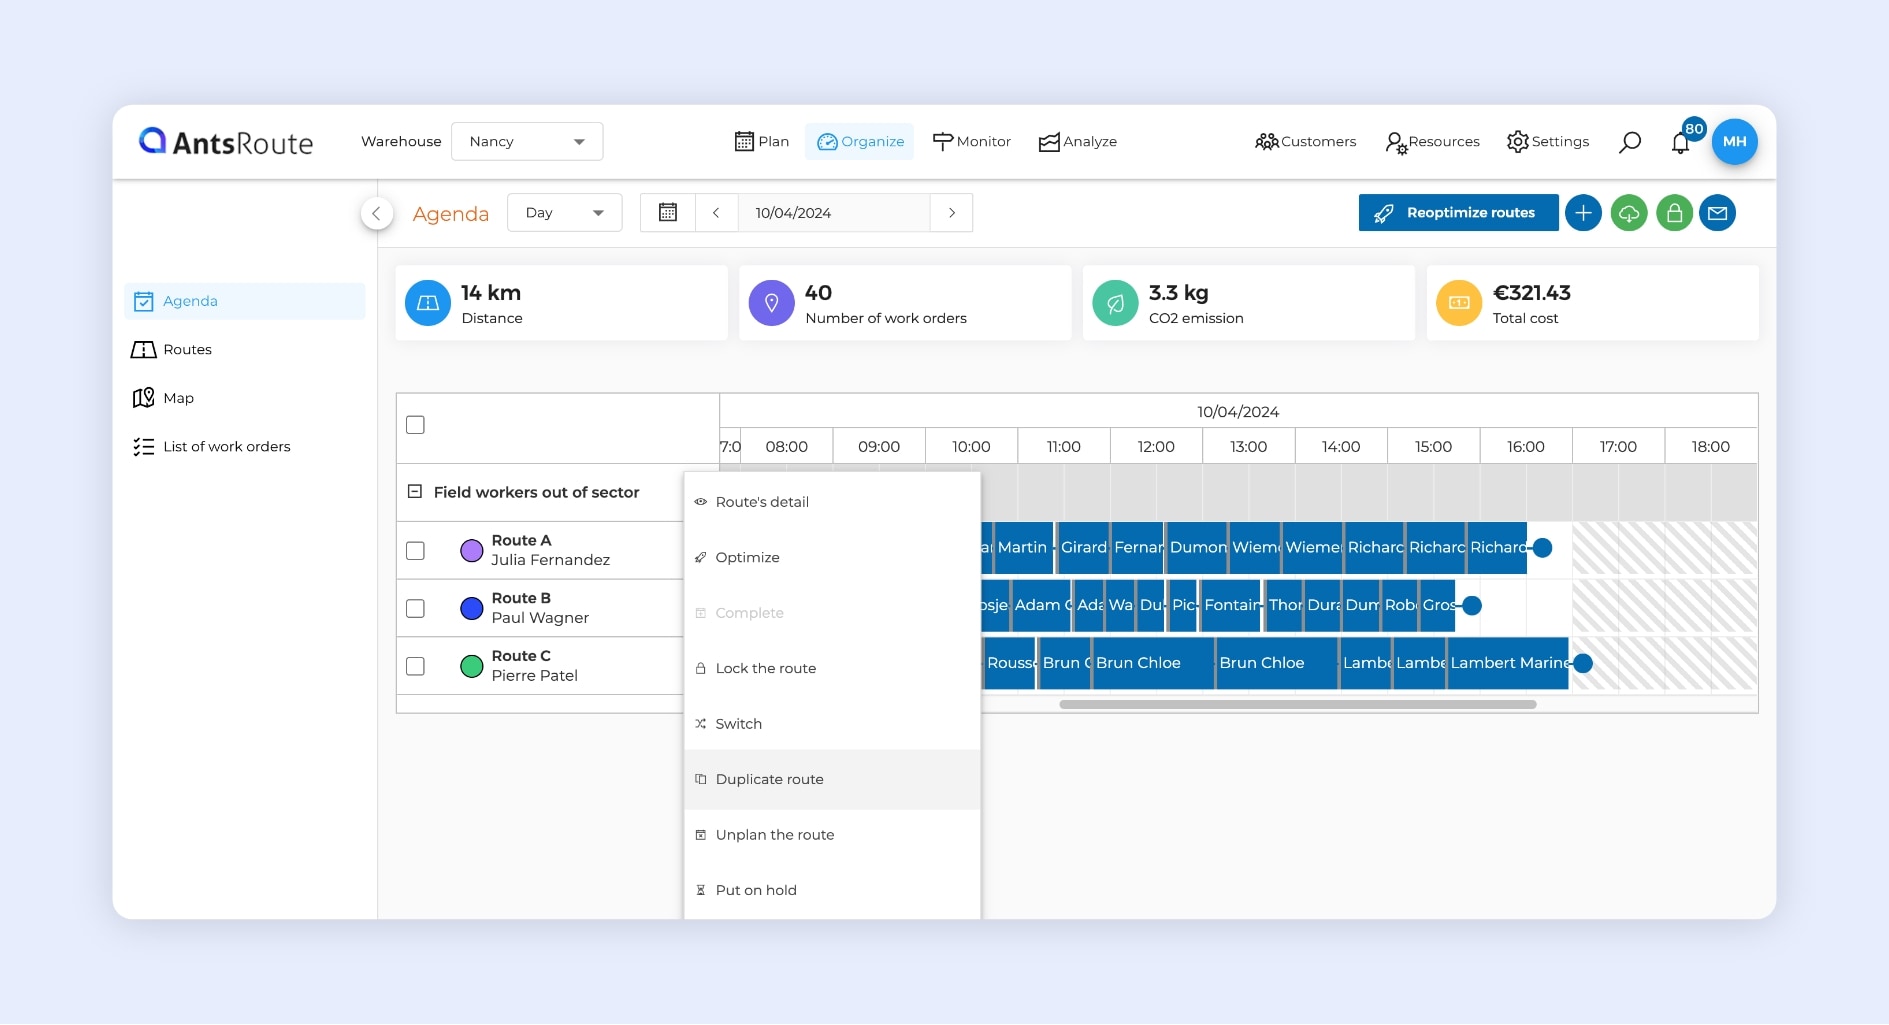
The duplication of a named route on AntsRoute.
There are more new features on AntsRoute:
- In your Excel or CSV file with a list of work orders to be imported, you can add a “customer comment”.
- You can now manage the absences of your drivers in a new dedicated tab (“Resources” > “Drivers” > “Absences”).
- If you use our booking site, you can now add expertises and certifications to the presentation of your company.
Do you have any questions? Don’t hesitate to contact our support team by filling in our contact form. See you soon on AntsRoute.
Optimise your delivery routes today
Free 7-day trial | No credit card required


