December 2024: What’s new in AntsRoute?
Blog > Product updates > December 2024: What’s new in AntsRoute?
December 2024: What’s new in AntsRoute?
Published on 13 December 2024 • Reading time: 5 min read
Discover the latest updates to AntsRoute, your favourite route optimisation software, just in time for Christmas! Always listening to our users, our technical teams have ramped up their efforts in recent weeks to develop features that meet your expectations. Ready to discover these new features? Let the AntsRoute team tell you about these end-of-year surprises!
Table of contents:
- Define up to 4 time slots for a type of service
- Save time by duplicating work orders
- User roles: View delivery and route prices
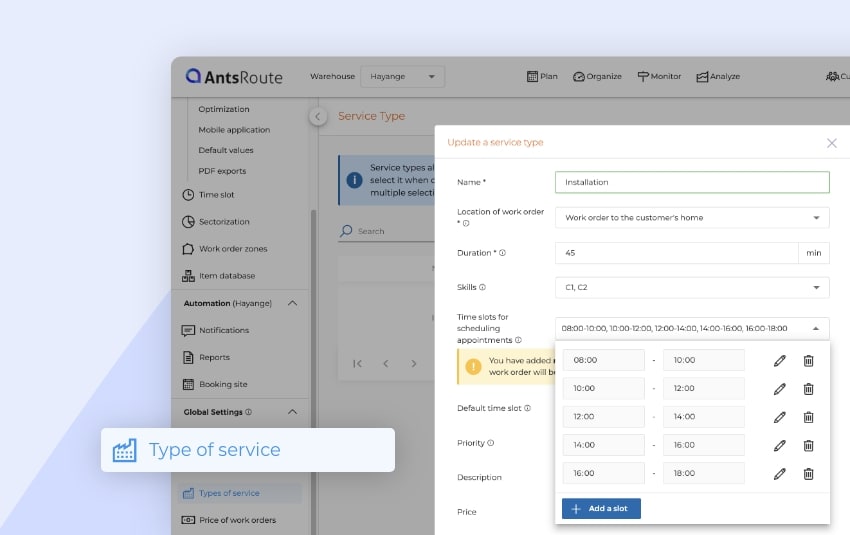
Define up to 4 time slots for a type of service
Until now, it was only possible to define a single time slot for each type of service. This meant that when a work order was scheduled from the “Schedule deliveries” tab, this single slot was automatically applied.
With this new update, AntsRoute now allows you to define up to four time slots when creating a type of service. This is particularly useful for users who schedule appointments based on incoming calls. Depending on the date of scheduling, AntsRoute will analyse the 4 time slots and allow you to select the one that is most advantageous in terms of reducing the number of kilometres travelled.
Note: You can also define a default time slot, which is used when planning work orders from the basket, by importing a file or when adding a recurrence.
How do I use this new feature?
It couldn’t be simpler! Here’s how to set up your time slots:
- Go to the “Settings” module > “Types of service”:
- Click on the “+” button in the top right-hand corner to create a new type of service.
- Fill in the essential information:
- Give your service a name.
- Specify a duration and, if necessary, the skills required to carry out the service.
- Add your time slots:
- Indicate up to 4 time slots that will be used when planning the appointment.
- Define a “default” time slot, which will be used for scheduling orders from the basket, by importing a file or for recurrence scheduling.
- Add optional details:
- Insert a description and a price if necessary, then save.
Once you have configured your type of service, you can select it when planning a work order. This configuration will automatically fill in a number of fields, including: duration, skills required, price and time slots.
To find out more about this function, see our support article.
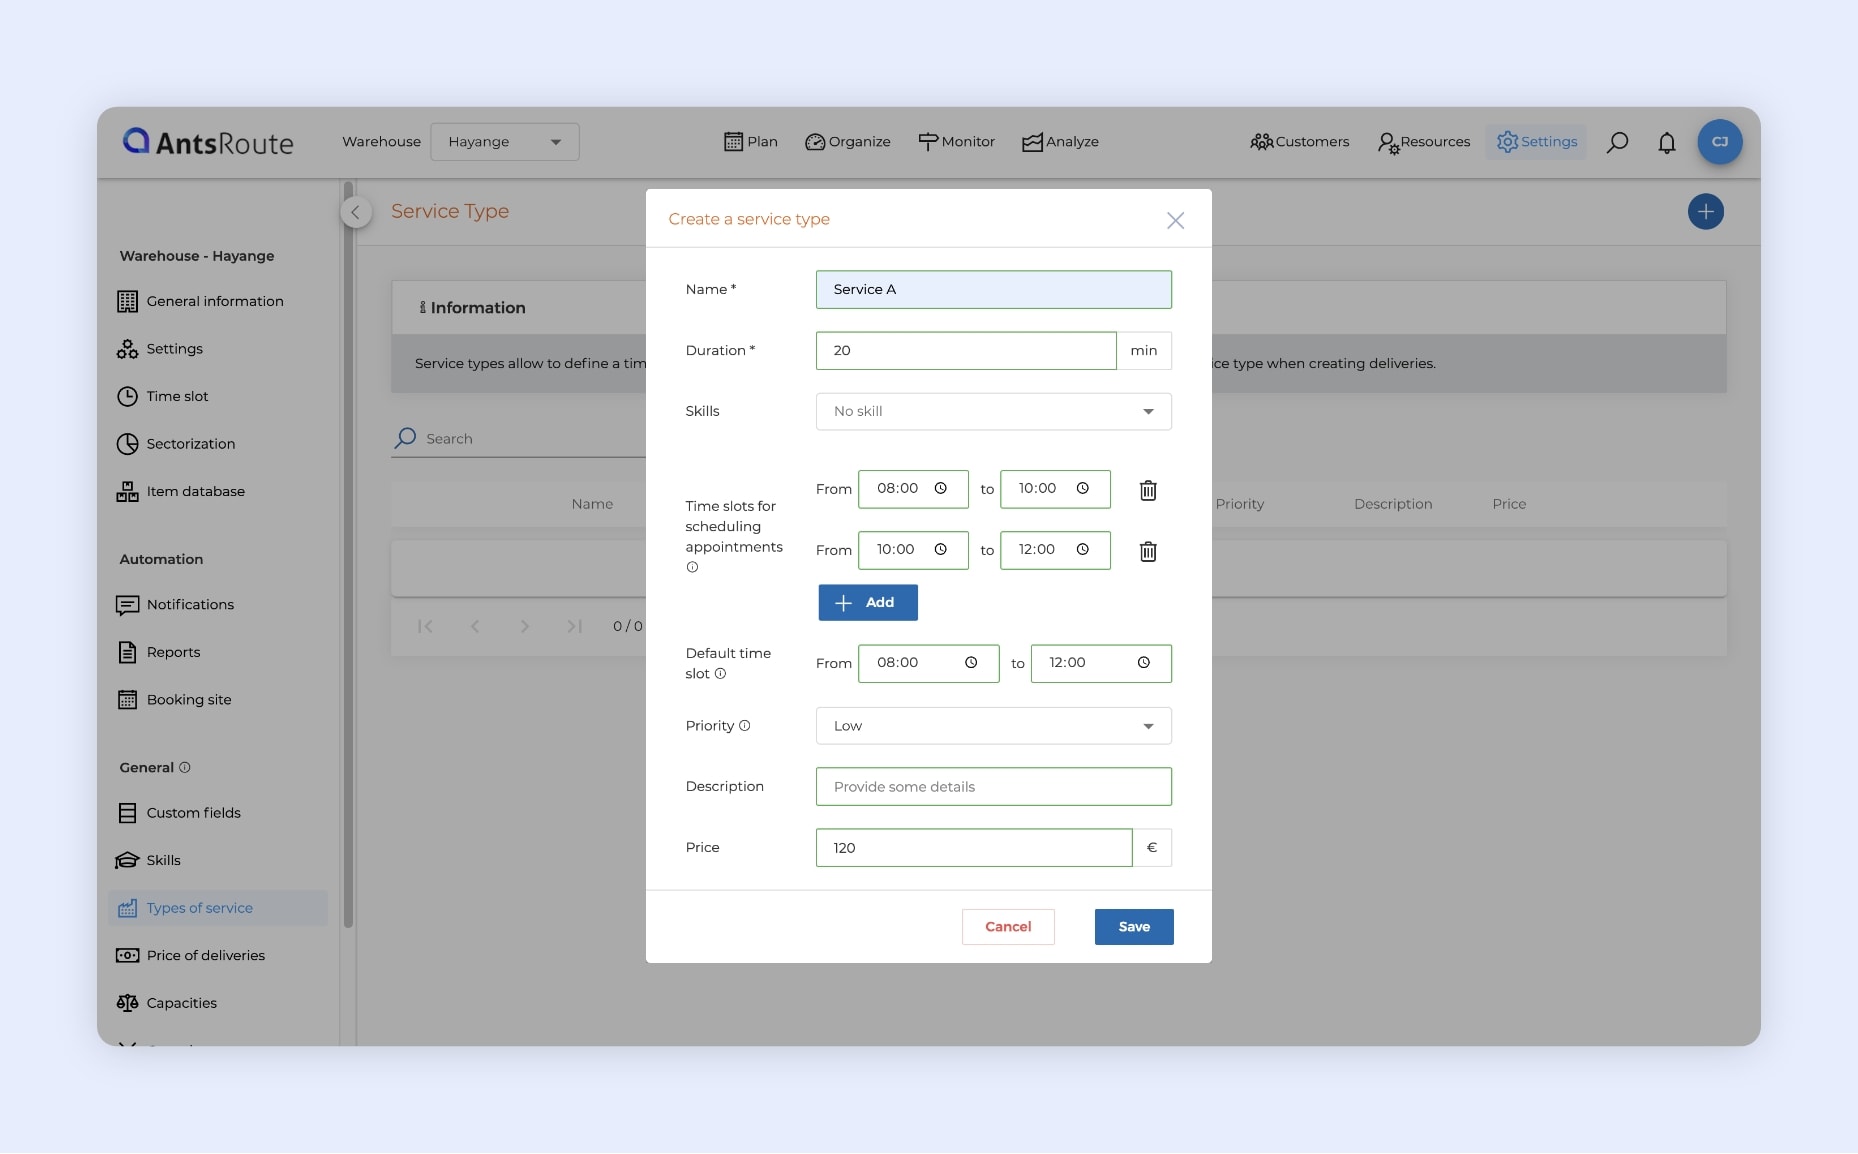
The addition of a type of service with multiple time slots on AntsRoute.
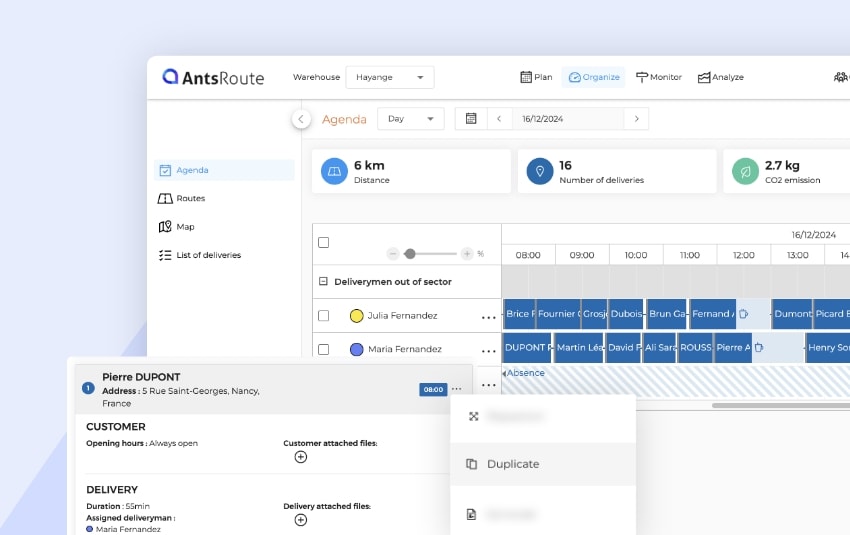
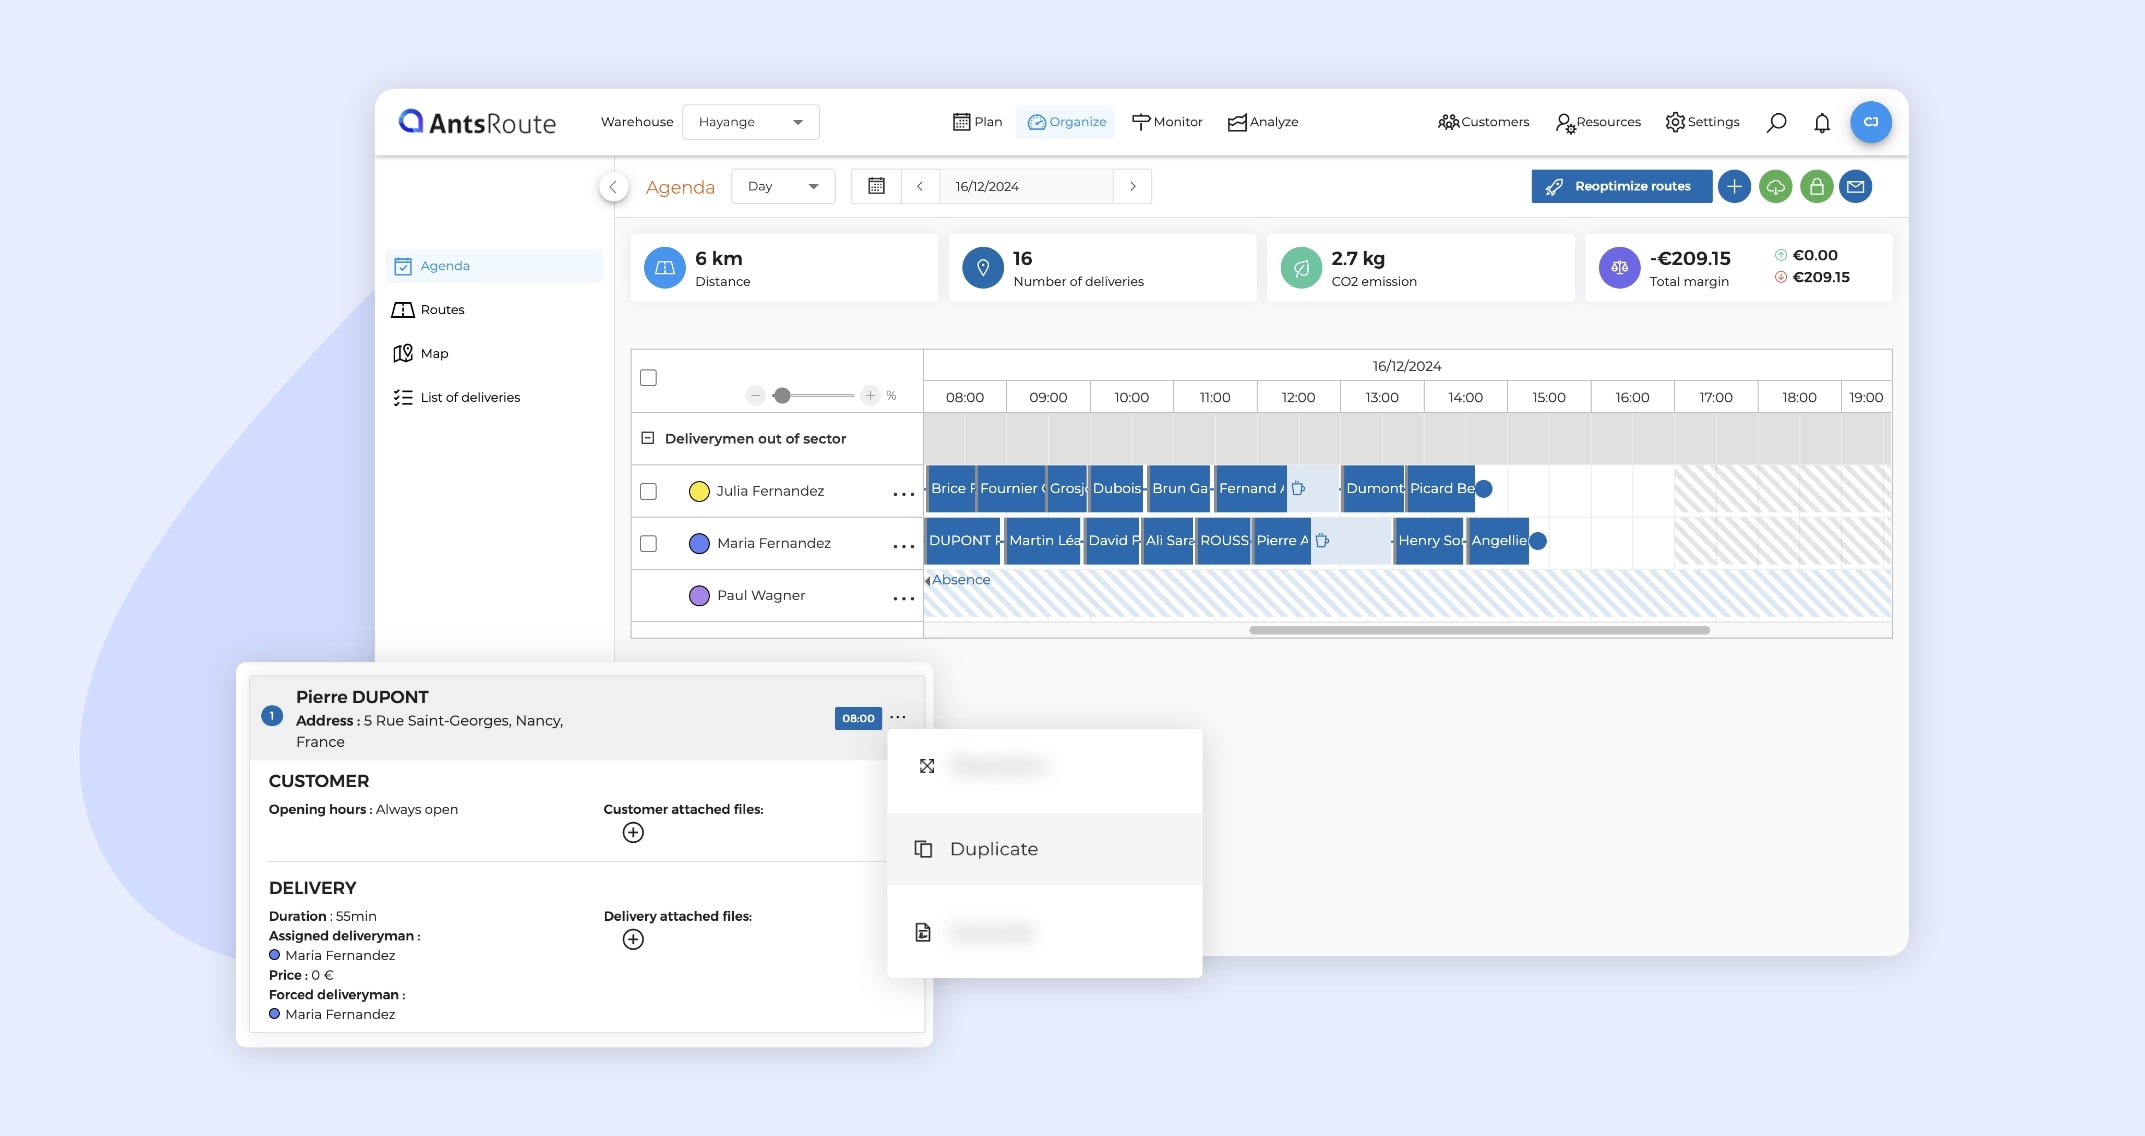
Save time by duplicating work orders
Here’s a new feature that’s been eagerly awaited by our users: the ability to duplicate a past or future task. Thanks to this feature, you can easily duplicate a work order while keeping all the constraints and information initially entered. Of course, you have the option of modifying this data if necessary before completing the duplication.
Note: You can also duplicate work orders (planned, done, cancelled or unassigned) directly from the “Analyse” module. This option is particularly useful for rescheduling cancelled tasks from the mobile application.
How do I duplicate a work order?
Here are the steps for using this function, for example from the “Organise” module:
- Access the “Organise” module and click on the “List of work orders” tab.
- Locate the task you want to duplicate, then click on “…” > “Duplicate”.
- Update the work order information if necessary and select a new planning date.
- Click on the “Add” button, and voilà, your task has been duplicated!
To find out more about this function, see our support article.

Duplicating a work order on AntsRoute.
User roles: View delivery and route prices
AntsRoute now gives you even greater control over user permissions. You can determine whether a user has the ability to view prices for work orders and routes. This new option adds to an already comprehensive list of settings, allowing you to fully customise roles and access within your team.
How can I customise user roles?
Creating roles tailored to your needs is very simple:
- Go to the role settings:
- Click on the blue circle with your initials at the top right, then select the “Roles” tab.
- Create a new role:
- Click on the “Add” button, then give the role a name.
- Define the permissions:
- Select the functionalities to which this role will have access:
- General settings.
- Modules, dashboard and alerts.
- Warehouse (or site / point of sale / agency).
- Resources.
- Customers (or patients).
- Deliveries (or field services / visits / pickups).
- Routes.
- In the “Manage the deliveries” section, activate or deactivate the “View prices of deliveries and routes” option as required.
- Select the functionalities to which this role will have access:
- Save the role:
- Click on “Save”, and your new role is ready to be assigned to your users.
To find out more about this function, see our support article.
Any questions? Don’t hesitate to contact our support team by filling in our contact form. We would be delighted to help you!
WRITTEN BY

Marie Henrion
At AntsRoute, Marie has been the marketing manager since 2018. With a focus on last-mile logistics, she produces content that simplifies complex topics such as route optimization, the ecological transition, and customer satisfaction.
Optimise your delivery routes today
Free 7-day trial | No credit card required